原文地址:http://www.videotutorialsrock.com/opengl_tutorial/transform/home.php
视频下载:http://www.videotutorialsrock.com/opengl_tutorial/transform/video.flv
文本课件:http://www.videotutorialsrock.com/opengl_tutorial/transform/text.php
代码下载:http://www.videotutorialsrock.com/opengl_tutorial/transform/transform.zip
译文:
变换
我们上一个程序有点单调。这是在编写3D程序么?看上去和2D一样!让我们搞点有趣的,我们想法让形状在3维中旋转。
首先来了解一点OpenGL关于变换的知识。为了方便说明,想象一直围绕场景转到小鸟。一开始它是在原点,面对着z轴的负半轴。这个小鸟可以移动,旋转,甚至可以放大或缩小。无论什么时候在OpenGL中使用glVertex函数,OpenGL将其解释为和小鸟相关联的。因此,如果我们想从远景的角度看,将小鸟缩小2倍并向右边移动2个单位,那么相对于小鸟坐标为(0,4,0)的点实际上在(1,2,0)上。而如果我们将小鸟关于X轴旋转90度,并向前(向屏幕里面,在屏幕上看上去就是向前移动了。)移动2个单位,相对鸟坐标为(0,0,-1)的点在整个坐标系中坐标为(0,-1,-2)。这个用下面的图片所示。注意为了观察方便,我们是从旁边进行观察的。
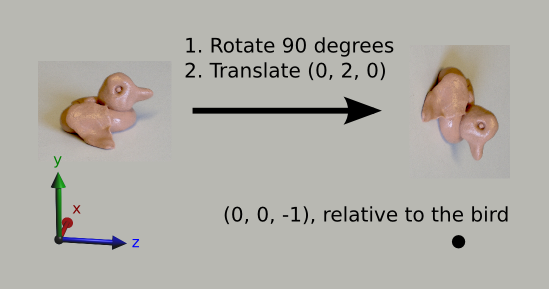
说到这,你可能会想,为什么不直接指定确定的点呢?这个在本课结束时就知道原因了。
我们沿用上节课的代码,只是删除了一些注释。首先,我们通过将我们的小鸟向前变换5个单位,并使用0作为z轴的值来代替所有点z轴坐标为-5。我们调用glTranslatef函数进行变换,我们将在x,y,z轴进行变换。
    glLoadIdentity(); //Reset the drawing perspective
    glTranslatef(0.0f, 0.0f, -5.0f); //Move forward 5 units

    glBegin(GL_QUADS);

    //Trapezoid
    glVertex3f(-0.7f, -1.5f, 0.0f);
    glVertex3f(0.7f, -1.5f, 0.0f);
    glVertex3f(0.4f, -0.5f, 0.0f);
    glVertex3f(-0.4f, -0.5f, 0.0f);

    glEnd();

    glBegin(GL_TRIANGLES);

    //Pentagon
    glVertex3f(0.5f, 0.5f, 0.0f);
    glVertex3f(1.5f, 0.5f, 0.0f);
    glVertex3f(0.5f, 1.0f, 0.0f);

    glVertex3f(0.5f, 1.0f, 0.0f);
    glVertex3f(1.5f, 0.5f, 0.0f);
    glVertex3f(1.5f, 1.0f, 0.0f);

    glVertex3f(0.5f, 1.0f, 0.0f);
    glVertex3f(1.5f, 1.0f, 0.0f);
    glVertex3f(1.0f, 1.5f, 0.0f);

    //Triangle
    glVertex3f(-0.5f, 0.5f, 0.0f);
    glVertex3f(-1.0f, 1.5f, 0.0f);
    glVertex3f(-1.5f, 0.5f, 0.0f);

    glEnd();
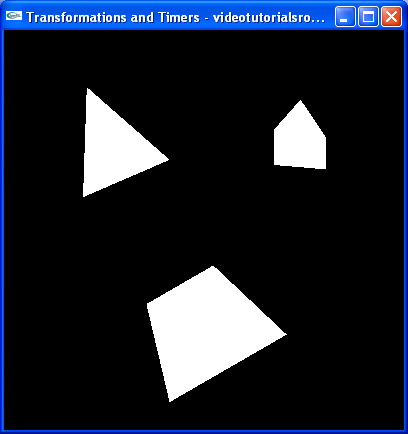
保存修改文件,编译并运行得到同前面一样的图形,这也是我们想要得到的。
现在要对上节课的glLoadIdentity()函数做些解释。这个函数的功能是重置我们的小鸟,使得开始位置在坐标原点并且面对z的负半轴。
现在进行更多的变换,无论我们指定某个物体的某一点,都是相对于物体中心点而言的。
    glLoadIdentity(); //Reset the drawing perspective
    glTranslatef(0.0f, 0.0f, -5.0f); //Move forward 5 units

    glPushMatrix(); //Save the transformations performed thus far
    glTranslatef(0.0f, -1.0f, 0.0f); //Move to the center of the trapezoid

    glBegin(GL_QUADS);

    //Trapezoid
    glVertex3f(-0.7f, -0.5f, 0.0f);
    glVertex3f(0.7f, -0.5f, 0.0f);
    glVertex3f(0.4f, 0.5f, 0.0f);
    glVertex3f(-0.4f, 0.5f, 0.0f);

    glEnd();

    glPopMatrix(); //Undo the move to the center of the trapezoid
    glPushMatrix(); //Save the current state of transformations
    glTranslatef(1.0f, 1.0f, 0.0f); //Move to the center of the pentagon

    glBegin(GL_TRIANGLES);

    //Pentagon
    glVertex3f(-0.5f, -0.5f, 0.0f);
    glVertex3f(0.5f, -0.5f, 0.0f);
    glVertex3f(-0.5f, 0.0f, 0.0f);

    glVertex3f(-0.5f, 0.0f, 0.0f);
    glVertex3f(0.5f, -0.5f, 0.0f);
    glVertex3f(0.5f, 0.0f, 0.0f);

    glVertex3f(-0.5f, 0.0f, 0.0f);
    glVertex3f(0.5f, 0.0f, 0.0f);
    glVertex3f(0.0f, 0.5f, 0.0f);

    glEnd();

    glPopMatrix(); //Undo the move to the center of the pentagon
    glPushMatrix(); //Save the current state of transformations
    glTranslatef(-1.0f, 1.0f, 0.0f); //Move to the center of the triangle

    glBegin(GL_TRIANGLES);

    //Triangle
    glVertex3f(0.5f, -0.5f, 0.0f);
    glVertex3f(0.0f, 0.5f, 0.0f);
    glVertex3f(-0.5f, -0.5f, 0.0f);

    glEnd();

    glPopMatrix(); //Undo the move to the center of the triangle
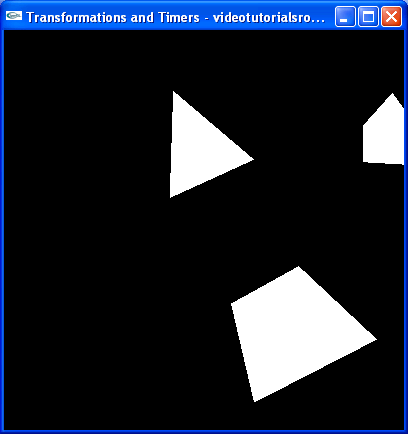
同样,保存并运行,得到和以前一样的图形。
这里有两个重要的函数:glPushMatrix()和glPopMatrix(),用来存储我们小鸟的状态。glPushMatrix()保存它的状态而glPopMatrix()还原到这个状态。注意和glBegin,glEnd一样,glPushMatrix和glPopMatrix必须匹配。为了撤销将物体向中间移动的状态必须先使用glPushMatrix。
每次可以保存多个状态,实际上是使用的一个堆栈保存状态的。每次我们调用glPushMatrix,就在堆栈顶部增加一个状态,每次调用glPopMatrix就移除一个状态。这个堆栈可以保存至少32种变换状态。
glPushMatrix和glPopMatrix的名字是由于OpenGL通过矩阵来描述物体的状态的。目前来说你无需关心这个矩阵到底是如何工作的。
好了,现在我们实际上已经改变了我们程序。现在我们将所有的物体旋转30度并缩小70%。
float _angle = 30.0f;

//Draws the 3D scene
void drawScene() {
    glClear(GL_COLOR_BUFFER_BIT | GL_DEPTH_BUFFER_BIT);

    glMatrixMode(GL_MODELVIEW); //Switch to the drawing perspective
    glLoadIdentity(); //Reset the drawing perspective
    glTranslatef(0.0f, 0.0f, -5.0f); //Move forward 5 units

    glPushMatrix(); //Save the transformations performed thus far
    glTranslatef(0.0f, -1.0f, 0.0f); //Move to the center of the trapezoid
    glRotatef(_angle, 0.0f, 0.0f, 1.0f); //Rotate about the z-axis

    glBegin(GL_QUADS);

    //Trapezoid
    glVertex3f(-0.7f, -0.5f, 0.0f);
    glVertex3f(0.7f, -0.5f, 0.0f);
    glVertex3f(0.4f, 0.5f, 0.0f);
    glVertex3f(-0.4f, 0.5f, 0.0f);

    glEnd();

    glPopMatrix(); //Undo the move to the center of the trapezoid
    glPushMatrix(); //Save the current state of transformations
    glTranslatef(1.0f, 1.0f, 0.0f); //Move to the center of the pentagon
    glRotatef(_angle, 0.0f, 1.0f, 0.0f); //Rotate about the y-axis
    glScalef(0.7f, 0.7f, 0.7f); //Scale by 0.7 in the x, y, and z directions

    glBegin(GL_TRIANGLES);

    //Pentagon
    glVertex3f(-0.5f, -0.5f, 0.0f);
    glVertex3f(0.5f, -0.5f, 0.0f);
    glVertex3f(-0.5f, 0.0f, 0.0f);

    glVertex3f(-0.5f, 0.0f, 0.0f);
    glVertex3f(0.5f, -0.5f, 0.0f);
    glVertex3f(0.5f, 0.0f, 0.0f);

    glVertex3f(-0.5f, 0.0f, 0.0f);
    glVertex3f(0.5f, 0.0f, 0.0f);
    glVertex3f(0.0f, 0.5f, 0.0f);

    glEnd();

    glPopMatrix(); //Undo the move to the center of the pentagon
    glPushMatrix(); //Save the current state of transformations
    glTranslatef(-1.0f, 1.0f, 0.0f); //Move to the center of the triangle
    glRotatef(_angle, 1.0f, 2.0f, 3.0f); //Rotate about the the vector (1, 2, 3)

    glBegin(GL_TRIANGLES);

    //Triangle
    glVertex3f(0.5f, -0.5f, 0.0f);
    glVertex3f(0.0f, 0.5f, 0.0f);
    glVertex3f(-0.5f, -0.5f, 0.0f);

    glEnd();

    glPopMatrix(); //Undo the move to the center of the triangle
现在我们的程序看起来像这样:
我们引入了一个新的变量_angle用来指定物体旋转的度数。同时我们使用了两个新的函数:glRotatef旋转我们的小鸟。glRotatef(_angle,0.0f,0.0f,1.0f)表示物体将绕z轴旋转_angle度,glRotatef(_angle,1.0f,2.0f,3.0f)表示物体将绕向量(1,2,3)旋转_angle度;glScalef(0.7f,0.7f,0.7f)将我们的小鸟分别在x,y,z轴上变为原来的0.7,0.7,0.7倍。如果我们用glScalef(2.0f,1.0f,1.0f),就在我们的视线里的水平方向上放大两倍(x轴)。
注意glTranslatef,glRotatef,glScalef不能在一个glBegin-glEnd区域内调用。
现在我们改变我们的镜头使得我们向左偏10度来观察。
float _cameraAngle = 10.0f;

//Draws the 3D scene
void drawScene() {
    glClear(GL_COLOR_BUFFER_BIT | GL_DEPTH_BUFFER_BIT);

    glMatrixMode(GL_MODELVIEW); //Switch to the drawing perspective
    glLoadIdentity(); //Reset the drawing perspective
    glRotatef(-_cameraAngle, 0.0f, 1.0f, 0.0f); //Rotate the camera
    glTranslatef(0.0f, 0.0f, -5.0f); //Move forward 5 units
结果看起来像这样:
这里我们使用了一点小技巧来改变镜头角度,我们只将整个场景向反方向移动了10度,这在3D编程中经常使用的技巧。
在我们进入时钟这个概念之前我想解释一下glMatrixMode这个函数。如果我们调用glMatrixMode(GL_MODEL_VIEW),我们是对整个场景里的点进行的变换。如果调用glMatrixMode(GL_PROJECTION),就像我们在handleResize函数中做的一样,将对物体里的点除了普通的变换外还进行特殊的变换。看下handleResize函数,我们转到射影矩阵模式(projection matrix mode),调用glLoadIdentity()重设所有的变换并调用gluPerspective。gluPerspective进行一个奇怪的变换来“透视”(perspective)所有点。不必关心具体如何实现,只需知道我们使用GL_PROJECTION模式来设置为们的远景,剩下的用GL_MODEL_VIEW设置。
GL_PROJECTION被解释对镜头变换模式,但这并不准确,因为光照在“透视”(projection)模式中并不会受变换的影响。使用这个模式来设置镜头不是一个好办法。
现在我们已经改变了镜头的角度,每个物体都不方便观察了,因此我们将_cameraAngle改为0.
时钟
现在我们使用GLUT的时钟增加一些动作。使用时钟的基本思路是我们想让一段代码经常执行。在我们这个例子中我们将物体的每25毫秒旋转2度。下面是做法。
void update(int value) {
    _angle += 2.0f;
    if (_angle > 360) {
        _angle -= 360;
    }

    glutPostRedisplay(); //Tell GLUT that the scene has changed

    //Tell GLUT to call update again in 25 milliseconds
    glutTimerFunc(25, update, 0);
}
这是我们的更新函数。首先我们将角度增加2度。如果角度大于360度,我们就减去360,这样并不改变表示的角度。这样做并不是必须的,但是这样做可以使得角度值比较小,因为涉及到浮点数精度的问题,这里不展开叙述。然后调用glutPostRedisplay()告诉GLUT场景已经改变需要重新绘制。最后调用glutTimerFunc(25,update,0)让GLUT在25毫秒之后调用update函数。
value参数是GLUT传递给update函数的,同我们传给glutTimerFunc函数的最后一个参数一样,大多数时候为0。我们并不需要使用这个参数,只是忽略它。
glutTimerFunc(25, update, 0); //Add a timer
我们在main函数中还要加上一个glutTimerFunc的调用,这样GLUT在程序运行25毫秒以后第一次调用这个函数。
好了,下载源码,编译运行下吧。牛B吧,现在我们可以让物体旋转了!
练习:
- 另外使用一个函数,使所有物体缩小一半,同时不能改变任何glVertex3f函数。
- 再使用一个glTranslatef函数,在不改变glVertex3f函数的情况下将三角形和五边形向右移动一个单位。
- 在不加额外时钟的情况下让不同的形状以不同的速度旋转。
- 不使用额外时钟,使得镜头围绕(0.1,-0.1,1)连续旋转。