转自:
http://www.codeproject.com/KB/system/fs-filter-driver-tutorial.aspx
Contents
- Introduction
- Creating a simple File System Filter Driver
- How to install a driver
- Running a sample
- Improvements
- Conclusion
- Useful references
This tutorial will show you how to develop a simple file system filter driver. The demo driver will print the names of opening files to the debug output.
The article requires basic Windows driver development and C/C++ knowledge. However, it may also be interesting to people without Windows driver development experience.
A file system filter driver is called on every file system I/O operation (create, read, write, rename, and etc.), and thus it can modify the file system behavior. File system filter drivers are almost similar to legacy drivers, but they require some special steps to do. Such drivers are used by anti-viruses, security, backup, and snapshot software.
To build a driver, you need WDK or the IFS Kit. You can get them from Microsoft’s website. Also, you have to set an environment variable %WINDDK% to the path where you have installed the WDK/IFS Kit.
Be careful: Even a small error in the driver may cause a BSOD or system instability.
This is the entry point of any driver. The first thing that we do is to store DriverObject to a global variable (we will need it later).
 Collapse
 Copy Code
PDRIVER_OBJECT g_fsFilterDriverObject = NULL;
NTSTATUS DriverEntry(
__inout PDRIVER_OBJECT DriverObject,
__in PUNICODE_STRING RegistryPath
)
{
NTSTATUS status = STATUS_SUCCESS;
ULONG i = 0;
g_fsFilterDriverObject = DriverObject;
...
}
The next step is to populate the IRP dispatch table with function pointers to IRP handlers. In our filter driver, there is a generic pass-through IRP handler (which sends the request further). And, we will need a handler for IRP_MJ_CREATE to retrieve the names of the opening files. The implementation of the IRP handlers will be described later.
 Collapse
 Copy Code
NTSTATUS DriverEntry(
__inout PDRIVER_OBJECT DriverObject,
__in PUNICODE_STRING RegistryPath
)
{
...
for (i = 0; i <= IRP_MJ_MAXIMUM_FUNCTION; ++i)
{
DriverObject->MajorFunction[i] = FsFilterDispatchPassThrough;
}
DriverObject->MajorFunction[IRP_MJ_CREATE] = FsFilterDispatchCreate;
...
}
A file system filter driver must have the fast-IO dispatch table. If you’ve forgot to set up the fast-IO dispatch table, it will lead to system crash. Fast-IO is an alternative way to initiate I/O operations (and it’s faster than IRP). Fast-IO operations are always synchronous. If the Fast-IO handler returns FALSE, it means the Fast-IO way is impossible and an IRP will be created.
 Collapse
 Copy Code
FAST_IO_DISPATCH g_fastIoDispatch =
{
sizeof(FAST_IO_DISPATCH),
FsFilterFastIoCheckIfPossible,
...
};
NTSTATUS DriverEntry(
__inout PDRIVER_OBJECT DriverObject,
__in PUNICODE_STRING RegistryPath
)
{
...
DriverObject->FastIoDispatch = &g_fastIoDispatch;
...
}
We should track the file system being activated/deactivated to perform attaching/detaching of our file system filter driver. How to start tracking file system changes is shown below.
 Collapse
 Copy Code
NTSTATUS DriverEntry(
__inout PDRIVER_OBJECT DriverObject,
__in PUNICODE_STRING RegistryPath
)
{
...
status = IoRegisterFsRegistrationChange(DriverObject,
FsFilterNotificationCallback);
if (!NT_SUCCESS(status))
{
return status;
}
...
}
Set driver unload routine
The last part of the driver initialization sets an unload routine. Setting the driver unload routine makes the driver unloadable, and you can load/unload it multiple times without system restart. However, this driver is made unloadable only for debugging purpose, because file system filters can’t be unloaded safely. Never do this in production code.
 Collapse
 Copy Code
NTSTATUS DriverEntry(
__inout PDRIVER_OBJECT DriverObject,
__in PUNICODE_STRING RegistryPath
)
{
...
DriverObject->DriverUnload = FsFilterUnload;
return STATUS_SUCCESS;
}
Driver unload routine is responsible for cleaning up and deallocation of resources. First of all, unregister the notification for file system changes.
 Collapse
 Copy Code
VOID FsFilterUnload(
__in PDRIVER_OBJECT DriverObject
)
{
...
IoUnregisterFsRegistrationChange(DriverObject, FsFilterNotificationCallback);
...
}
Then loop through the devices we created, detach and delete them. Wait for 5 seconds to let all outstanding IRPs to be completed. As it was mentioned before, this is a debug only solution. It works in the majority of cases, but there is no guarantee for all.
 Collapse
 Copy Code
VOID FsFilterUnload(
__in PDRIVER_OBJECT DriverObject
)
{
...
for (;;)
{
IoEnumerateDeviceObjectList(
DriverObject,
devList,
sizeof(devList),
&numDevices);
if (0 == numDevices)
{
break;
}
numDevices = min(numDevices, RTL_NUMBER_OF(devList));
for (i = 0; i < numDevices; ++i)
{
FsFilterDetachFromDevice(devList[i]);
ObDereferenceObject(devList[i]);
}
KeDelayExecutionThread(KernelMode, FALSE, &interval);
}
}
This IRP handler does nothing except passing requests further to the next driver. We have the next driver object stored in our device extension.
 Collapse
 Copy Code
NTSTATUS FsFilterDispatchPassThrough(
__in PDEVICE_OBJECT DeviceObject,
__in PIRP Irp
)
{
PFSFILTER_DEVICE_EXTENSION pDevExt =
(PFSFILTER_DEVICE_EXTENSION)DeviceObject->DeviceExtension;
IoSkipCurrentIrpStackLocation(Irp);
return IoCallDriver(pDevExt->AttachedToDeviceObject, Irp);
}
This IRP handler is invoked on every create file operation. We will grab a filename from PFILE_OBJECT and print it to the debug output. Then, we call the pass-through handler described above. Pay attention to the fact that a valid file name exists in PFILE_OBJECT only while the create file operation is being performed! Also there are relative opens, and opens by ID. Retrieving file names in those cases is beyond the scope of this article.
 Collapse
 Copy Code
NTSTATUS FsFilterDispatchCreate(
__in PDEVICE_OBJECT DeviceObject,
__in PIRP Irp
)
{
PFILE_OBJECT pFileObject = IoGetCurrentIrpStackLocation(Irp)->FileObject;
DbgPrint("%wZ\n", &pFileObject->FileName);
return FsFilterDispatchPassThrough(DeviceObject, Irp);
}
To test the Fast-IO dispatch table validity for the next driver, we will use the following helper macro (not all of the Fast-IO routines must be implemented by the underlying file system, so we have to be sure about that):
 Collapse
 Copy Code
#define VALID_FAST_IO_DISPATCH_HANDLER(_FastIoDispatchPtr, _FieldName) \
(((_FastIoDispatchPtr) != NULL) && \
(((_FastIoDispatchPtr)->SizeOfFastIoDispatch) >= \
(FIELD_OFFSET(FAST_IO_DISPATCH, _FieldName) + sizeof(void *))) && \
((_FastIoDispatchPtr)->_FieldName != NULL))
Passing through Fast-IO requests requires writing a lot of code (in contrast to passing through IRP requests) because each Fast-IO function has its own set of parameters. A typical pass-through function is shown below:
 Collapse
 Copy Code
BOOLEAN FsFilterFastIoQueryBasicInfo(
__in PFILE_OBJECT FileObject,
__in BOOLEAN Wait,
__out PFILE_BASIC_INFORMATION Buffer,
__out PIO_STATUS_BLOCK IoStatus,
__in PDEVICE_OBJECT DeviceObject
)
{
PDEVICE_OBJECT nextDeviceObject =
((PFSFILTER_DEVICE_EXTENSION)DeviceObject->DeviceExtension)->AttachedToDeviceObject;
PFAST_IO_DISPATCH fastIoDispatch = nextDeviceObject->DriverObject->FastIoDispatch;
if (VALID_FAST_IO_DISPATCH_HANDLER(fastIoDispatch, FastIoQueryBasicInfo))
{
return (fastIoDispatch->FastIoQueryBasicInfo)(
FileObject,
Wait,
Buffer,
IoStatus,
nextDeviceObject);
}
return FALSE;
}
This is a special Fast-IO request which we have to handle ourselves and not call the next driver. We have to detach our filter device from the file system device stack and delete our device. That can be done easily by the following code:
 Collapse
 Copy Code
VOID FsFilterFastIoDetachDevice(
__in PDEVICE_OBJECT SourceDevice,
__in PDEVICE_OBJECT TargetDevice
)
{
IoDetachDevice(TargetDevice);
IoDeleteDevice(SourceDevice);
}
A typical file system consists of a control device and volume devices. A volume device is attached to the storage device stack. The control device is registered as a file system.
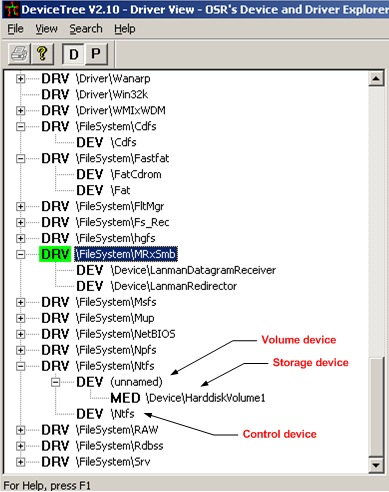
Figure 1 - Devices of the typical file system
We have a callback which is invoked for all active file systems and whenever a file system has either registered or unregistered itself as an active one. This is a good place to attach/detach our filter device. When a file system activates itself, we attach to its control device (only if we are not already attached), enumerate its volume devices, and attach to them too. On file system deactivation, we examine the file system control device stack, find our device, and detach it. Detaching from the file system volume devices is performed in the FsFilterFastIoDetachDevice routine described earlier.
 Collapse
 Copy Code
VOID FsFilterNotificationCallback(
__in PDEVICE_OBJECT DeviceObject,
__in BOOLEAN FsActive
)
{
if (FsActive)
{
FsFilterAttachToFileSystemDevice(DeviceObject);
}
else
{
FsFilterDetachFromFileSystemDevice(DeviceObject);
}
}
This file contains helper routines for attaching, detaching, and checking whether our filter is already attached.
To perform attaching, we create a new device object with the device extension (call IoCreateDevice) and the propagate device object flags from the device object we are trying to attach to (DO_BUFFERED_IO, DO_DIRECT_IO, FILE_DEVICE_SECURE_OPEN). Then, we call IoAttachDeviceToDeviceStackSafe in a loop with a delay in the case of failure. It is possible for this attachment request to fail because the device object has not finished initialization. This situation can occur if we try to mount the filter that was loaded as the volume only. When attaching is finished, we save the “attached to” device object to the device extension and clear the DO_DEVICE_INITIALIZING flag. The device extension is shown below:
 Collapse
 Copy Code
typedef struct _FSFILTER_DEVICE_EXTENSION
{
PDEVICE_OBJECT AttachedToDeviceObject;
} FSFILTER_DEVICE_EXTENSION, *PFSFILTER_DEVICE_EXTENSION;
Detaching is quite simple. Get the “attached to” device object from the device extension and call IoDetachDevice and IoDeleteDevice.
 Collapse
 Copy Code
void FsFilterDetachFromDevice(
__in PDEVICE_OBJECT DeviceObject
)
{
PFSFILTER_DEVICE_EXTENSION pDevExt =
(PFSFILTER_DEVICE_EXTENSION)DeviceObject->DeviceExtension;
IoDetachDevice(pDevExt->AttachedToDeviceObject);
IoDeleteDevice(DeviceObject);
}
To check whether we are attached to a device, we have to iterate through the device stack (using IoGetAttachedDeviceReference and IoGetLowerDeviceObject) and search for our device there. We distinguish our devices by comparing the device driver object with our driver object (g_fsFilterDriverObject).
 Collapse
 Copy Code
BOOLEAN FsFilterIsMyDeviceObject(
__in PDEVICE_OBJECT DeviceObject
)
{
return DeviceObject->DriverObject == g_fsFilterDriverObject;
}
Sources and makefile files are used by the build utility to build the driver. It contains project settings and source file names.
Sources file contents:
 Collapse
 Copy Code
TARGETNAME  = FsFilter
TARGETPATH  = obj
TARGETTYPE  = DRIVER
DRIVERTYPE  = FS
SOURCES     = \
Main.c \
IrpDispatch.c \
AttachDetach.c \
Notification.c \
FastIo.c
The makefile is standard:
 Collapse
 Copy Code
!include $(NTMAKEENV)\makefile.def
The MSVC makefile project build command line is:
 Collapse
 Copy Code
call $(WINDDK)\bin\setenv.bat $(WINDDK) chk wxp
cd /d $(ProjectDir)
build.exe –I
We will use sc.exe (sc – service control) to manage our driver. It is a command-line utility that can be used to query or modify the database of installed services. It is shipped with Windows XP and higher, or you can find it in the Windows SDK/DDK.
To install the driver, call:
 Collapse
 Copy Code
sc create FsFilter type= filesys binPath= c:\FSFilter.sys
A new service entry will be created with the name FsFilter; the service type will be file system, and the binary path, c:\FsFilter.sys.
To start the driver, call:
 Collapse
 Copy Code
sc start FsFilter
This starts a service named FsFilter.
To stop the driver, call:
 Collapse
 Copy Code
sc stop FsFilter
This stop the service named FsFilter.
And to uninstall, call:
 Collapse
 Copy Code
sc delete FsFilter
This instructs the service manager to delete the service entry with the name FsFilter.
All those commands are put into a single batch file to make driver testing easier. Here is the listing of the Install.cmd command file:
 Collapse
 Copy Code
sc create FsFilter type= filesys binPath= c:\FsFilter.sys
sc start FsFilter
pause
sc stop FsFilter
sc delete FsFilter
pause
This is the most interesting part. To demonstrate the file system filter work, we will use Sysinternals DebugView for Windows to monitor the debug output, and OSR Device Tree to see the devices and drivers.
So, build the driver. Then, copy the build output file FsFilter.sys and the install the script Install.cmd to the root of the disk C.
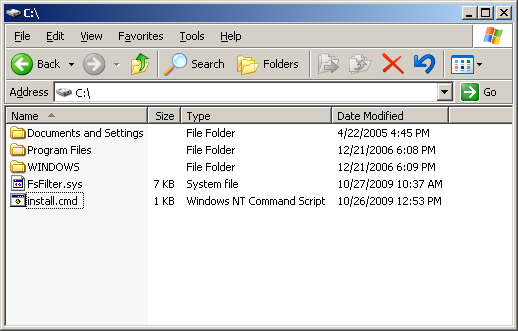
Figure 2 - The driver and the install script on the disk.
Run Install.cmd. It will install and start the driver and then wait for user input.
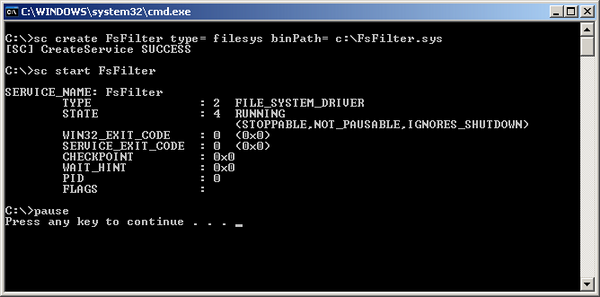
Figure 3 - The driver is successfully installed and started.
Now start the DebugView utility.
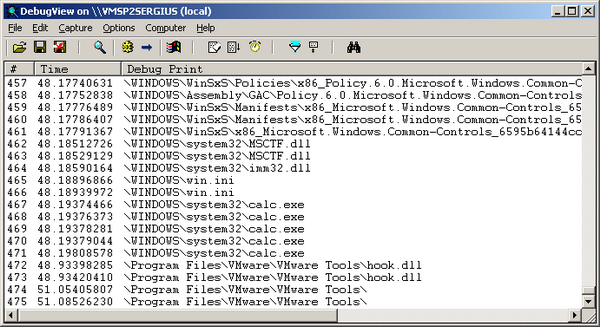
Figure 4 - Monitoring the debug output.
We can see what files are being opened! Our filter works. Now, run the device tree utility and locate our driver there.

Figure 5 - Our filter driver in the device tree.
We can see numerous devices created by our driver. Now let’s open the NTFS driver and look at the device tree:
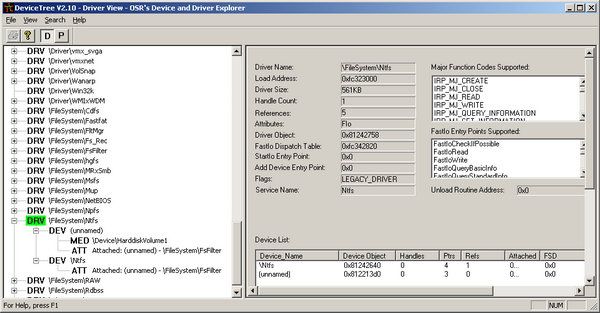
Figure 6 - Our filter is attached to NTFS.
We are attached. Let’s take a look at the other file systems.
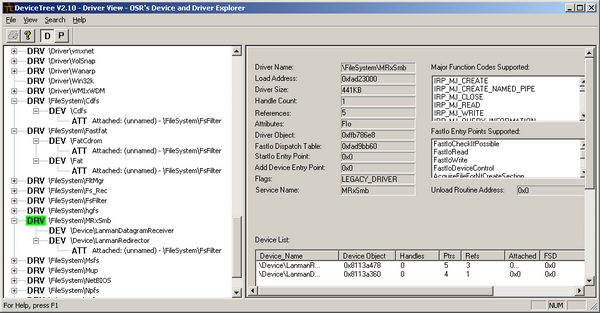
Figure 7 - Our filter is attached to the other file systems too.
And finally, press any key to move our install script forward. It will stop and uninstall the driver.
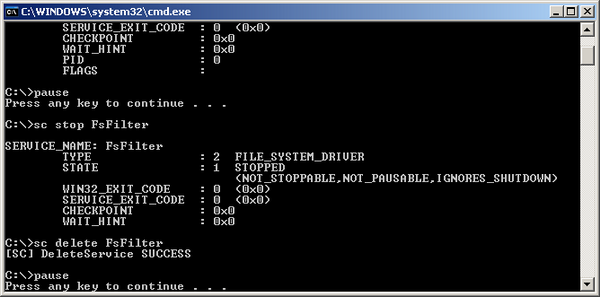
Figure 8 - The driver is stopped and uninstalled.
Refresh the device tree list by pressing F5:
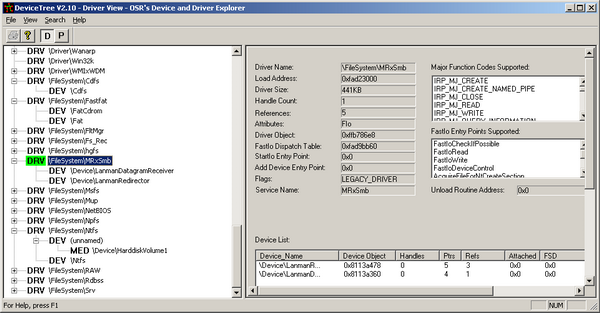
Figure 9 - Our filter device isnot in the device tree.
Our filter is gone. The system is running as before.
The sample driver lacks a commonly required functionality of attaching to the newly arrived volumes. It is done so to make the driver as easy to understand as possible. You can write a IRP_MJ_FILE_SYSTEM_CONTROL handler of your own to track the newly arrived volumes.
This tutorial showed how to create a simple file system filter driver, and how to install, start, stop, and uninstall it from a command line. Also, some file system filter driver aspects were discussed. We saw the file system device stack with the attached filters, and learned how to monitor the debug output from the driver. You may use the provided sources as a skeleton for your own file system filter driver or modify its behavior.
- File System Filter Drivers
- Content for File System or File System Filter Developers
- Windows NT File System Internals (OSR Classic Reprints) (Paperback)
- sfilter DDK sample
Read more Driver Development tips at the Apriorit Case Studies section.