简介:
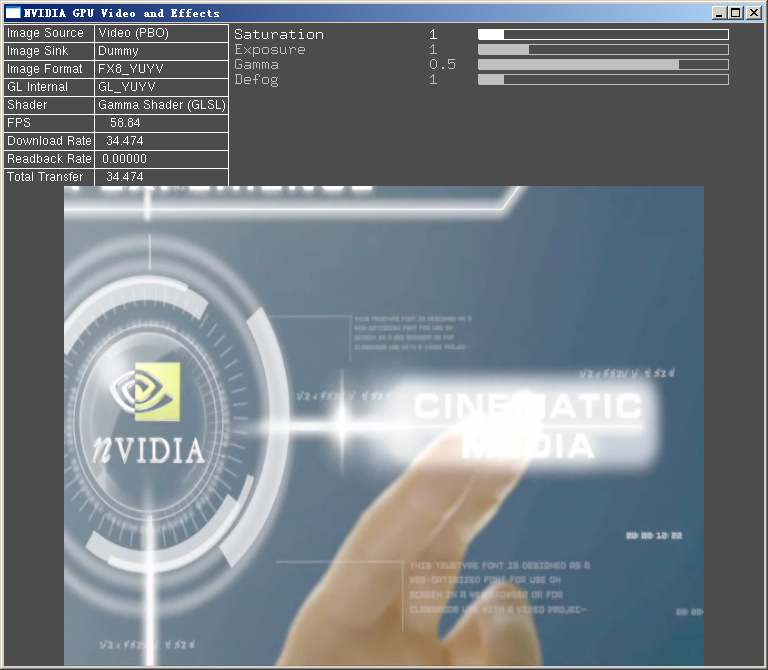
This sample uses the GPU to render post-processing effects with source images and video. It takes advantage of the nv_image_processing framework, Cg, and GLSL for to implement several video filters, including guassian blur, edge detection overlay, wobble, TV-noise, radial blur, and night vision. 这个例子用GPU渲染对图片或视频进行后处理得到的效果。它利用nv_image_processing框架,Cg还有GLSL实现了几种视频过滤器,包括高斯模糊,edge detection overlay, wobble, TV-noise, radial blur, and night vision.
截图:
 编译:
编译: VC7.1编译的,但是我机器上没装,只有VC8.0,所以要把其用到的lib也都用VC8重新生成一下(期间会遇到n个编译不过的地方)。
lib的solution目录NVIDIA Corporation\SDK 9.5\LIBS\
这些lib里面最麻烦的是这个OpenEXR-1.2.1-win32,要自己下载源码来生成对应的lib.
最搞的是这个地方,nErrorCode总是1282(0x502),害得程序执行不起来,我重新安装了驱动也不好使,最后我加了句return直接返回,程序就执行起来了

void gl_assert(const char * zFile, unsigned int nLine)
{
return; // lyl: 直接返回了
GLenum nErrorCode = glGetError();
if (nErrorCode != GL_NO_ERROR)
{
const GLubyte * zErrorString = gluErrorString(nErrorCode);
std::cerr << "Assertion failed (" <<zFile << ":"
<< nLine << ": " << zErrorString << std::endl;
exit(-1);
}
}
dshow用的是dxsdk_feb2005_extras.exe里面的,怎一个“烦”字了得啊!
代码注解:
渲染核心代码如下
Scene::render()
{
double time;
if (_bUseGLSL) {
time = renderGLSL();
}
else
{
if (!_bUseNVImage)
{
time = renderCg();
}
else
{
time = renderNVImageProc();
}
}
return time;
}
没看到opengl的API不算看到核心,进一个里面看看
Scene::renderGLSL()
{
assert(_pImageSource != 0);
unsigned int nDownloadedBytes = _pImageSource->pushNewFrame();
float nX = 0.0f, nY = 0.0f;
float nImageWidth = static_cast<float>(_pImageSource->image().width());
float nImageHeight = static_cast<float>(_pImageSource->image().height());
if (nImageWidth < MIN_WIDTH) {
nX = (_nWindowWidth - nImageWidth) / 2;
}
if (nImageHeight < (_nWindowHeight - _pApplicationInfo->height())) {
nY = (_nWindowHeight - _pApplicationInfo->height() - nImageHeight) / 2;
}
double timer = 0.0;
glClear(GL_COLOR_BUFFER_BIT);
glViewport(0, 0, (GLsizei) _nWindowWidth, (GLsizei) _nWindowHeight - _pApplicationInfo->height());
glMatrixMode(GL_MODELVIEW);
glLoadIdentity();
gluOrtho2D(0, _nWindowWidth, 0, _nWindowHeight - _pApplicationInfo->height());
assert(_pProgramGLSL != 0);
_pProgramGLSL->setWindowSize(_nWindowWidth, _nWindowHeight);
_pProgramGLSL->setTextureSize( (int)nImageWidth, (int)nImageHeight, 0 );
_pProgramGLSL->bind(); // bind our vertex/pixel shader program
if (_pInteractionController)
_pInteractionController->updateUniforms();
// draw the image as a textured quad
glEnable (GL_FRAGMENT_PROGRAM_NV);
glEnable (GL_TEXTURE_RECTANGLE_NV);
// draw the image as a textured quad
glBegin (GL_QUADS);
glTexCoord2f (0.0, 0.0); glVertex2f(nX, (_bInvertTexCoords ? nImageHeight : 0.0) + nY);
glTexCoord2f (nImageWidth, 0.0); glVertex2f(nImageWidth+nX, (_bInvertTexCoords ? nImageHeight : 0.0) + nY);
glTexCoord2f (nImageWidth, nImageHeight); glVertex2f(nImageWidth+nX, (_bInvertTexCoords ? 0.0 : nImageHeight) + nY);
glTexCoord2f (0.0, nImageHeight); glVertex2f(nX, (_bInvertTexCoords ? 0.0 : nImageHeight) + nY);
glEnd ();
glDisable (GL_TEXTURE_RECTANGLE_NV);
glDisable (GL_FRAGMENT_PROGRAM_NV);
_pProgramGLSL->unbind();
assert(_pApplicationInfo != 0);
_pApplicationInfo->setBytesDownloaded(nDownloadedBytes);
// draw the GUI elements
glViewport(0, _nWindowHeight - _pApplicationInfo->height(), _nWindowWidth, _pApplicationInfo->height());
glMatrixMode(GL_MODELVIEW);
glLoadIdentity();
gluOrtho2D(0, _nWindowWidth, 0, _pApplicationInfo->height());
_pApplicationInfo->render(0, 0);
// Now render the slider bars
glViewport(0, 0, _nWindowWidth, _nWindowHeight);
if (_pInteractionController)
_pInteractionController->renderSliders(_pApplicationInfo->width(), 0);
glutSwapBuffers();
assert(_pImageSink != 0);
// readback
unsigned int nReadBytes = _pImageSink->pull(0, 0);
// number of bytes read back will be displayed
// in successive frame
_pApplicationInfo->setBytesRead(nReadBytes);
return timer;
}
3D部分的主体架构可以参照这儿看看就明白了
NVIDIA SDK 9.5 Simple Texture Rectangle 原理一样,都是往一个面上贴了个texture。
上面这个的texture是静态的,从硬盘上的图片生成的;
本篇里面是动态的,一帧一帧的视频或者图片进行下后处理然后放到texture里面。2009-1-9
Video Filter
posted on 2008-12-23 01:45
七星重剑 阅读(1363)
评论(0) 编辑 收藏 引用 所属分类:
Game Graphics 、
IDE -- visual c++