新建网页 1
13
构造了一个地形以后,我们想要有移动摄像机的能力,以便模拟在地形上行走的效果。我们需要调整摄像机的高度,这依赖于地形部分的知识,好的,继续往下看。我们首先需要找到照相机所在的方格的位置,并给出x轴和z轴坐标,cTerrain::get_height函数能做到这些,它能提供x轴、z轴坐标参数,返回摄像机需要被设置在地形上的高度值,现在看实现部分。
float cTerrain::get_height(float x, float z)
{
// Translate on xz-plane by the transformation that takes the terrain START point to the origin,
// note that we negative z value so positive z-axis will be down in logical.
x = m_width/2.0f + x;
z = m_depth/2.0f - z;
// Scale down by the transformation that makes the cell_spacing equal to one.
x /= m_cell_spacing;
z /= m_cell_spacing;
We first translate by the transformation that takes the start point of the terrain to the origin. Next, we scale by the inverse of the cell spacing variable; this scaling sets the cell spacing to 1. Then we switch to a new frame of reference where the positive z-axis points “down.” Of course, there is no code that changes the frame of reference, but it is now understood that +z goes down. Figure 13.9 shows these steps graphically.
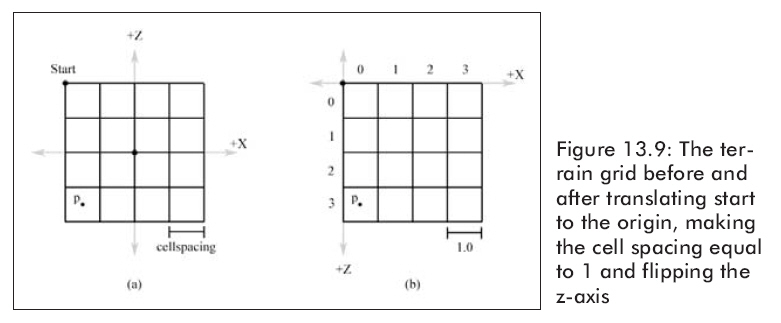
We see that our changed coordinate system matches the ordering of a matrix. That is, the upper-left corner is at the origin, the column count increases in the right direction, and the row count increases in the down direction. Thus, by Figure 13.9 and knowing the cell spacing is equal to 1, we can immediately see that the row and column of the cell we are in is given by:
// From now on, we will interpret our positive z-axis as going in the 'down' direction,
// rather than the 'up' direction. This allows to extract the row and column simply by
// 'flooring' x and z:
float col = floorf(x);
float row = floorf(z);
// ensures row and col are valid
if(row < 0)
row = 0;
if(row >= m_num_cells_per_col - 1)
row = m_num_cells_per_col - 1;
if(col < 0)
col = 0;
if(col >= m_num_cells_per_row)
col = m_num_cells_per_row;
现在我们将取得方格的四个顶点的高度。
// get the heights of the quad we're in:
//
// A B
// *---*
// | / |
// *---*
// C D
float AHeight = get_height_map_entry(row, col);
float BHeight = get_height_map_entry(row, col+1);
float CHeight = get_height_map_entry(row+1, col);
float DHeight = get_height_map_entry(row+1, col+1);
现在我们知道了方格的四个顶点的高度,我们需要找到照相机所在的位置的方格的高度,因为一个方格可能同时向几个方向倾斜,这可能会稍微难一点,见图 13.10:
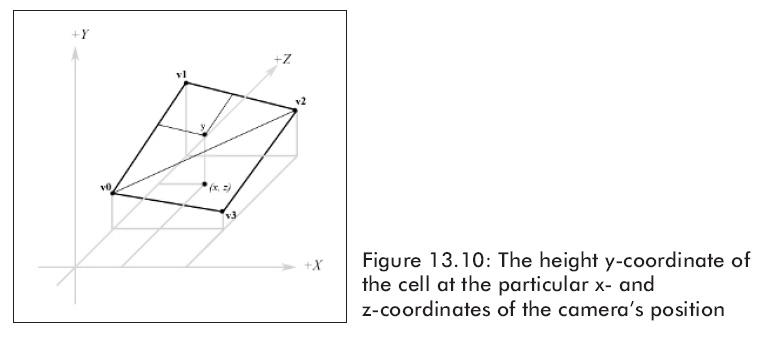
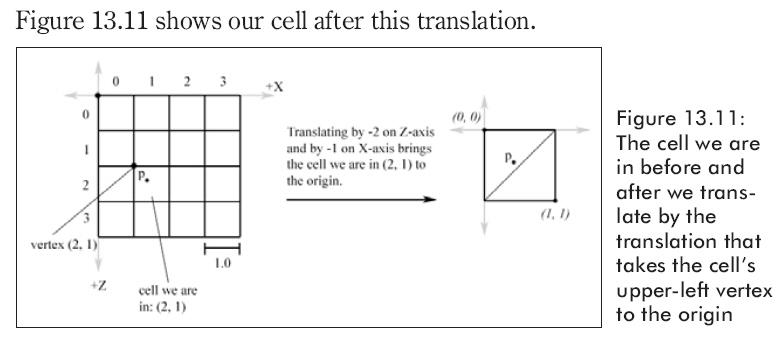
为了找到高度,我们需要知道我们在方格中的哪个三角形里。方格是由二个三角形渲染成的,找到我们所在的三角形,我们要取得我们所在的方格并且转换它,它的左上点是原点。
自从用行和列来描述我们所在的方格左上顶点的位置以来,我们必须沿x轴平移-col个单位,并沿z轴平移-row个单位。沿着x轴和z轴的平移过程用如下代码表示。
//
// Find the triangle we are in:
//
// Translate by the transformation that takes the upper-left corner of the cell we are in
// to the origin. Recall that our cell_spacing was nomalized to 1. Thus we have a unit square
// at the origin of our +x -> 'right' and +z -> 'down' system.
float dx = x - col;
float dz = z - row;
float height = 0.0f;
Then, if dx < 1.0 – dx we are in the “upper” triangle v0v1v2. Otherwise, we are in the “lower” triangle v0v2v3 (see Figure 13.10).
Now we explain how to find the height if we are in the “upper” triangle. The process is similar for the “lower” triangle, and of course the code for both follows shortly. To find the height if we are in the “upper”triangle, we construct two vectors, u = (cellSpacing, B – A, 0) and v = (0, C – A, – cellSpacing), on the sides of the triangle and originating at the terminal point of the vector q = (qx, A, qz) as Figure 13.12.a shows. Then we linearly interpolate along u by dx, and we linearly interpolate along v by dz. Figure 13.12.b illustrates these interpolations. The y-coordinate of the vector (q + dxu + dzv) gives the height based on the given x- and z-coordinates; recall the geometric interpretation of vector addition to see this.
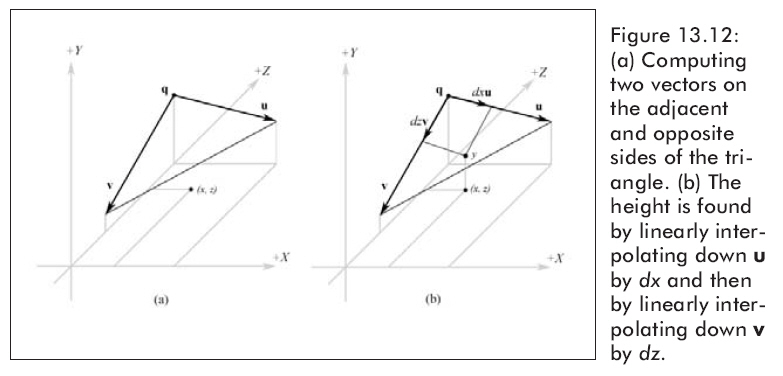
注意:我们只关心改变的高度值,我们只修改y值,忽视其他部分,因此,Height=A + dxuy + dzvy
float height = 0.0f;
if(dz < 1.0f - dx) // upper triangle ABC
{
float uy = BHeight - AHeight; // A->B
float vy = CHeight - AHeight; // A->C
// Linearly interpolate on each vector. The height is the vertex height the vectors u and v
// originate from {A}, plus the heights found by interpolating on each vector u and v.
height = AHeight + lerp(0.0f, uy, dx) + lerp(0.0f, vy, dz);
}
else // lower triangle DCB
{
float uy = CHeight - DHeight; // D->C
float vy = BHeight - DHeight; // D->B
// Linearly interpolate on each vector. The height is the vertex height the vectors u and v
// originate from {D}, plus the heights found by interpolating on each vector u and v.
height = DHeight + lerp(0.0f, uy, 1.0f - dx) + lerp(0.0f, vy, 1.0f - dz);
}
return height;
}
Lerp函数是一个沿着一维直线的基本线性插值算法,实现如下:
float lerp(float a, float b, float t)
{
return a * (1 - t) + (b * t);
}
绘制函数:
void cTerrain::draw(D3DXMATRIX* world_matrix, bool draw_triangle)
{
if(m_device == NULL)
return;
m_device->SetTransform(D3DTS_WORLD, world_matrix);
m_device->SetStreamSource(0, m_vertex_buffer, 0, sizeof(cTerrainVertex));
m_device->SetFVF(TERRAIN_VERTEX_FVF);
m_device->SetIndices(m_index_buffer);
m_device->SetTexture(0, m_texture);
m_device->SetRenderState(D3DRS_LIGHTING, FALSE); // trun off lighting since we're lighting it ourselves
m_device->DrawIndexedPrimitive(D3DPT_TRIANGLELIST, 0, 0, m_num_vertices, 0, m_num_triangles);
m_device->SetRenderState(D3DRS_LIGHTING, TRUE);
if(draw_triangle)
{
m_device->SetRenderState(D3DRS_FILLMODE, D3DFILL_WIREFRAME);
m_device->DrawIndexedPrimitive(D3DPT_TRIANGLELIST, 0, 0, m_num_vertices, 0, m_num_triangles);
m_device->SetRenderState(D3DRS_FILLMODE, D3DFILL_SOLID);
}
}