vim代码补全
现在的图形界面的IDE(Integrated Development Environment)一般具有语法高亮,语法检查,自动补全功能,大大提高了编程的效率。
vim作为文本编辑器其强大的编辑能力很大部分来自于普通模式命令,用户使用这些命令可以快速的在文档中移动、定位、查找、替换删除、而不用使用鼠标去完成这些操作。vim另一个强大之处是支持各种插件安装,用户可以根据功能需求和习惯安装需要的插件。本文将介绍两个非常强大的开源vim插件使得vim具有IDE一样的功能,提高使用vim编程的效率。这两个vim插件分别是spf13 和 YouCompleteMe
1. vim7.4添加Lua支持
之所以安装支持Lua的vim7.4,是因为spf13需要Lua支持。
1.1 安装Lua和LuaJit
Centos的官方源中包含Lua,可以直接使用Yum命令安装
sudo yum install lua lua-devel -y
Luajit不在Centos的官方源中,需要源码安装
wget http://luajit.org/download/LuaJIT-2.0.4.tar.gz tar -xzvf LuaJIT-2.0.4.tar.gz cd LuaJIT-2.0.4 // 使用默认安装路径 make sudo make install
1.2编译安装vim7.4
// git好处是以后可以方便地更新 git clone git@github.com:vim/vim.git tar xzvf vim-7.4.tar.bz2 cd vim74 ./configure --prefix=/usr/local/bin/vim74 \ --with-features=huge \ --with-luajit \ --enable-pythoninterp=yes \ --with-python-config-dir=/usr/lib64/python2.7/config \ --enable-luainterp=yes \ --enable-fail-if-missing --enable-fail-if-missing make sudo make install
2. 安装spf13
自己配置vim往往很繁琐,需要对vim配置很熟悉,spf13-vim不仅配置精良而且包含一整套精心挑选的插件,省去了很多配置细节。
curl https://j.mp/spf13-vim3 -L > spf13-vim.sh && sh spf13-vim.sh
3. 安装和配置YouCompleteMe
3.1 安装YouCompleteMe
YouCompleteMe是一个vim插件,而在spf13中指定安装YouCompleteMe插件也很方便,只需要在文件~/.vimrc.before.local中添加下面一行,然后使用Vundle安装命令即可。
let g:spf13_bundle_groups=['general', 'youcompleteme']
Vundle命令安装:
vim :BundleInstall!
编译ycm_core.so:
ycm自动补全需要动态库ycm_core.so,需要用户自己编译,用户可以选择编译全部功能或者选择只支持C/C++自动补全:
cd ~/.vim/bundle/YouCompleteMe/ ./install.py --all #编译支持所有功能 or ./install.py --clang-completer #只支持C/C++补全
3.2 YouCompleteMe配置
YouCompleteMe有两个需要配置的地方一个是.virmc,另一个是.ycm_extra_conf.py。
.vimrc位于用户home目录下,用来配置YouCompleteMe的全局行为,例如全局ycm_extra_conf.py路径,代码跳转快捷键映射。我的.vimrc配置如下:
" YouCompleteMe { if count(g:spf13_bundle_groups, 'youcompleteme') let g:acp_enableAtStartup = 0 " global conf which is needed to resolve name in system include " file or other third-part include file let g:ycm_global_ycm_extra_conf = '~/.vim/data/ycm/.ycm_extra_conf.py' " enable completion from tags let g:ycm_collect_identifiers_from_tags_files = 1 let g:ycm_seed_identifiers_with_syntax = 1 let g:ycm_confirm_extra_conf = 0 let g:ycm_cache_omnifunc=0 let g:ycm_key_invoke_completion = '<C-;>' nnoremap <F5> :YcmForceCompileAndDiagnostics<CR> nnoremap <leader>jd :YcmCompleter GoToDefinitionElseDeclaration<CR>
上面配置中全局.ycm_extra_conf.py路径很重要,如果不配置将无法解析C/C++头文件
.ycm_extra_conf.py 模版位于./YouCompleteMe/third_party/ycmd/cpp/ycm/,其中-isystem flag用来配置系统头文件路径,-I用来配置第三方头文件路径, 一个支持C/C++工程的ycm_extra_conf.py部分配置文件如下:
'-std=c++11', #'-std=c99', # ...and the same thing goes for the magic -x option which specifies the # language that the files to be compiled are written in. This is mostly # relevant for c++ headers. # For a C project, you would set this to 'c' instead of 'c++'. '-x', 'c++', '-isystem', '../BoostParts', #-isystem: system include file path '-isystem', '/usr/include', '-isystem', '/usr/local/include', '-isystem', '/usr/include/c++/4.8.5', ]
YouCompleteMe查找.ycm_extra_conf.py过程是在当前编辑文件所在目录查找,然后逐级向上查找,如果没有找到则使用全局配置文件。
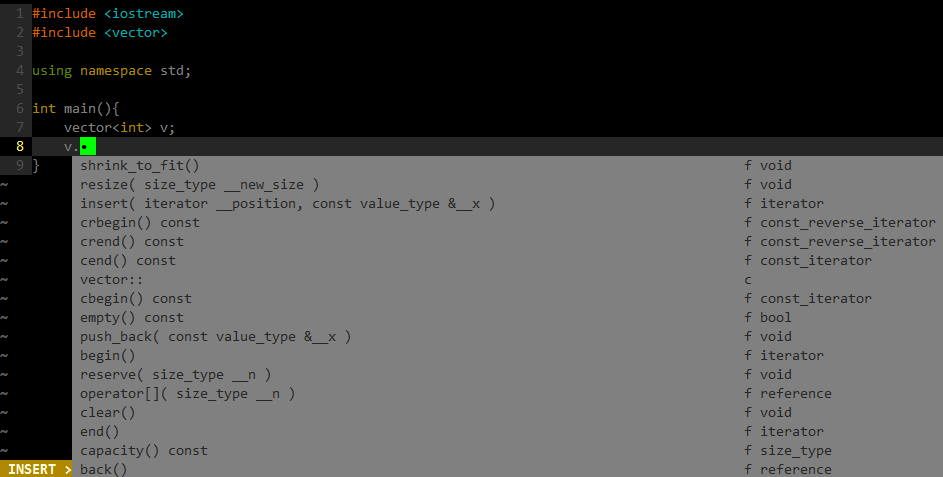
最后截图:

posted on 2017-11-24 15:40
长戟十三千 阅读(636)
评论(0) 编辑 收藏 引用 所属分类:
编程技巧随笔