Posted on 2009-06-01 22:55
syzfeng 阅读(3081)
评论(0) 编辑 收藏 引用

首先要感谢网络和网友,许多写程序过程中遇到的问题是借助网络解决的,网友对于我遇到的类似问题的解答给我提供了很多思路,当然还有MSDN,我的水平才会不断提高,可能以后也不会再用vc++6.0开发软件了,花点时间将以前的成果总结一下。
工程示例实现的美化内容包括:
- 给工程添加背景图与文字:图的位置、大小,文字的字体、大小均可以通过更改参数来改变;
- 完全手动绘制链接效果的按钮;并带有实时提示功能;
- 解决刷新界面时的闪烁问题;
具体实现过程如下:
- 为方便使用MFC提供的控件,我们建立单文档工程时将视类的基类选为CFormView类
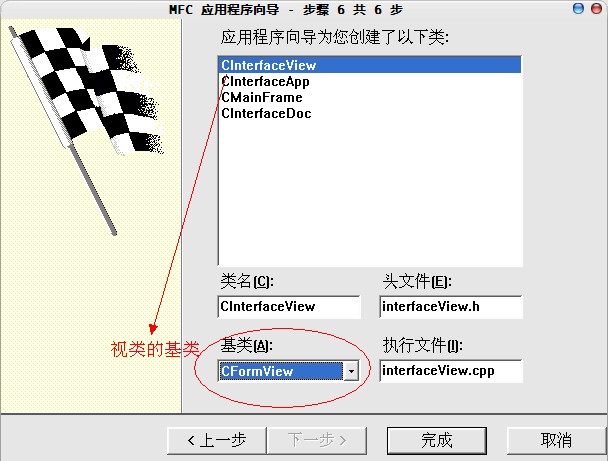
如果是基于对话框的工程,直接“完成”就行了。
2 闪屏的解决。
因为需要图像图形的操作,很多代码可能会放到OnDraw(),或者OnPaint()函数里执行,那样就会导致刷新界面时的闪烁,原因网上介绍的很多,解决方法也很多,本文采用利用兼容DC(也叫内存DC)的方法实现,思路是在内存中建立一块和界面一样大小的位图,将所有在界面上的绘制操作现在内存位图里画好,然后再一并复制到显示设备地址上去,(原理说的不是很严谨,不过就那意思)
代码送上:
 void CEODSVer2_1View::OnDraw(CDC* pDC)


 {
{
 // TODO: Add your specialized code here and/or call the base class
CDC MemDC; //首先定义一个显示设备对象
CBitmap MemBitmap;//定义一个位图对象
MemDC.CreateCompatibleDC(NULL);
CRect rt;
GetClientRect(&rt);
MemBitmap.CreateCompatibleBitmap(pDC,rt.Width(),rt.Height()); //建立与屏幕显示兼容的位图,
CBitmap *pOldBit=MemDC.SelectObject(&MemBitmap); //将位图选入到内存设备中
//设置背景色
MemDC.FillSolidRect(0,0,rt.Width(),rt.Height(),COLOR_BKGD);

 /**//****************************************************************************/
这里实现绘图的所有操作
/**//**********************************************************************************************/
pDC->BitBlt(0,0,rt.Width(),rt.Height(),&MemDC,0,0,SRCCOPY); //将内存图拷贝到屏幕上进行显示
MemBitmap.DeleteObject(); //绘图完成后的清理
MemDC.DeleteDC();
//InvalidateRect(m_Button_Logon,FALSE);
 }
}3 添加背景图片与文字。
这个简单,在OnDraw()函数里实现 ^_^ 代码送上:
/**//************************************************************************/
/**//* 贴背景图与写大标题 */
/**//********************begin x**********************************************/
CBitmap bitmap;
BITMAP bmp;
bitmap.LoadBitmap(IDB_BITMAP1);
bitmap.GetBitmap(&bmp);
CDC pCompatableDC1;
pCompatableDC1.CreateCompatibleDC(&MemDC);// MemDC是上文提到的DC,所有绘图操作都在兼容DC里完成
pCompatableDC1.SelectObject(&bitmap);
MemDC.SetStretchBltMode(HALFTONE); // 防止位图缩小时失真
CRect m_Area_Title;
GetClientRect(&m_Area_Title); //获得显示位图的区域,
MemDC.StretchBlt(m_Area_Title.left,//这四个参数表示显示位图到哪个区域
m_Area_Title.top,
m_Area_Title.Width(),
m_Area_Title.Height()-200,
&pCompatableDC1,
0,0,bmp.bmWidth,bmp.bmHeight, //这四个参数表示要显示位图的哪部分,现在显示全部位图
SRCCOPY);
MemDC.SetBkMode(TRANSPARENT);
CFont m_font_title;
m_font_title.CreatePointFont(220,"仿宋_GB2312"); //设置标题的字体与大小
MemDC.SelectObject(&m_font_title);
MemDC.SetTextColor(RGB(255,0,0));
MemDC.DrawText("测试系统",
CRect(0,0,m_Area_Title.Width(),m_Area_Title.Height()), //写文字的矩形区域,可以自己更改
DT_CENTER|/**//*DT_VCENTER|*/DT_SINGLELINE);
/**//**************************end x***************************************/
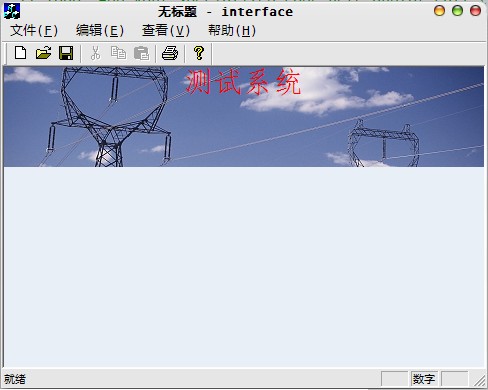
效果图:
4 带提示功能的链接效果的按钮(不是tip)
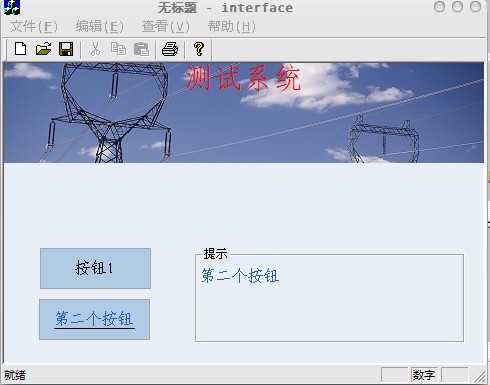
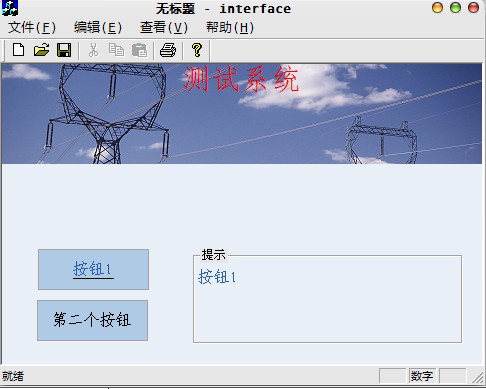
效果如图:
需要添加的代码
首先需要添加3个成员变量与一个函数:
1CRect m_Button_1;
2 CRect m_Button_2;
3 CRect m_Area_3;
4 void DrawButtonText(CDC* pmemdc,CRect rc, CString text,CString describe,CRect area_describe, COLORREF textcolor, BOOL underline=FALSE );
5
OnInitialUpdate()里添加的代码有:
1void CInterfaceView::OnInitialUpdate()
2{
3 CFormView::OnInitialUpdate();
4 GetParentFrame()->RecalcLayout();
5 ResizeParentToFit();
6 GetDlgItem(IDC_STATIC1)->GetWindowRect(&m_Button_1);
7 GetDlgItem(IDC_STATIC2)->GetWindowRect(&m_Button_2);
8 GetDlgItem(IDC_STATIC3)->GetWindowRect(&m_Area_3);
9 ScreenToClient(&m_Button_1);
10 ScreenToClient(&m_Button_2);
11 ScreenToClient(&m_Area_3);
12 m_Area_3.InflateRect(-5,-20,-5,-20);
13}
然后添加鼠标移动消息响应函数:
1void CInterfaceView::OnMouseMove(UINT nFlags, CPoint point)
2{
3 // TODO: Add your message handler code here and/or call default
4 CDC *pClientDC= GetDC();
5 static BOOL iswrite_Button_1=FALSE;
6 static BOOL iswrite_Button_2=FALSE;
7 if (m_Button_1.PtInRect(point)) //如果鼠标在登录按钮内
8 {
9 SetCursor(AfxGetApp()->LoadCursor(IDC_CURSOR1));
10 if (!iswrite_Button_1) //只写一次
11 {
12 DrawButtonText(pClientDC,m_Button_1,
13 "按钮1",
14 "按钮1",
15 m_Area_3,RGB(42,95,170),TRUE);
16 iswrite_Button_1=TRUE;
17 }
}
18 }else if(m_Button_2.PtInRect(point)) //鼠标不在上述按钮但在退出内
19 {
20 SetCursor(AfxGetApp()->LoadCursor(IDC_CURSOR1)); //设置光标为手型
21 if (!iswrite_Button_2) //只写一次
22 {
23 DrawButtonText(pClientDC,m_Button_2,
24 "第二个按钮",
25 "第二个按钮",
26 m_Area_3,RGB(42,95,170),TRUE);
27 iswrite_Button_2=TRUE;
28 }
29 }else{ //鼠标不在上述按钮内时
30 InvalidateRect(&m_Area_3,FALSE); //刷新描述区
31 m_Button_1.InflateRect(-1,-1,-1,-1);
32 m_Button_2.InflateRect(-1,-1,-1,-1);
33 InvalidateRect(&m_Button_1,FALSE);
34 InvalidateRect(&m_Button_2,FALSE);
35 m_Button_1.InflateRect(1,1,1,1);
36 m_Button_2.InflateRect(1,1,1,1);
37 iswrite_Button_1=FALSE;
38 iswrite_Button_2=FALSE;
39 }
40 ReleaseDC(pClientDC);
41 CFormView::OnMouseMove(nFlags, point);
42}
在OnDraw()函数里添加的代码有:
MemDC.FillSolidRect(m_Button_1,RGB(175,202,228));
MemDC.FillSolidRect(m_Button_2,RGB(175,202,228));
DrawButtonText(&MemDC,m_Button_1,"按钮1","",m_Area_3,RGB(0,0,0));
DrawButtonText(&MemDC,m_Button_2,"第二个按钮","",m_Area_3,RGB(0,0,0));
然后是DrawButtonText()的实现:
1void CInterfaceView::DrawButtonText(CDC* pmemdc,CRect rc, CString text,CString describe,CRect area_describe, COLORREF textcolor, BOOL underline)
2{
3 pmemdc->SetBkMode(TRANSPARENT);
4 CFont m_font_text;
5 m_font_text.CreatePointFont(120,"仿宋_GB2312");
6 pmemdc->SelectObject(&m_font_text);
7 pmemdc->SetTextColor(textcolor);
8 pmemdc->DrawText(text, rc, DT_CENTER|DT_VCENTER|DT_SINGLELINE);
9 pmemdc->DrawText(describe, area_describe, DT_LEFT);
10
11 CSize sz=pmemdc->GetTextExtent(text);
12 if (underline) //绘制下划线
13 {
14 CPen UnderLinePen;
15 UnderLinePen.CreatePen(PS_SOLID,1,RGB(0,0,0));
16 pmemdc->SelectObject(&UnderLinePen);
17
18 pmemdc->MoveTo(rc.left+(rc.Width()-sz.cx)/2,rc.bottom-(rc.Height()-sz.cy)/2);
19 pmemdc->LineTo(rc.right-(rc.Width()-sz.cx)/2,rc.bottom-(rc.Height()-sz.cy)/2);
20 }
21 else
22 {
23 CPen UnderLinePen;
24 UnderLinePen.CreatePen(PS_SOLID,1,RGB(175,202,228));
25 pmemdc->SelectObject(&UnderLinePen);
26 pmemdc->MoveTo(rc.left+(rc.Width()-sz.cx)/2,rc.bottom-(rc.Height()-sz.cy)/2);
27 pmemdc->LineTo(rc.right-(rc.Width()-sz.cx)/2,rc.bottom-(rc.Height()-sz.cy)/2);
28 }
29}
到此实现了简单的按钮功能,如果需要添加按钮响应函数可以在鼠标左击、右击等消息响应函数里实现;效果虽然没有CButtonST好,但是更节省代码与内存资源占用,如果要实现按钮的动态效果,可以在按钮四周画不同颜色的线,把文字侧移一下(实际上微软按钮效果就是那样实现的),第一篇先到此为止。
工程下载:
/Files/syzfeng/interface-blog.rar