1、打开wxFormBuilder,按开始一个空项目。您也可以执行File|New来创建新项目
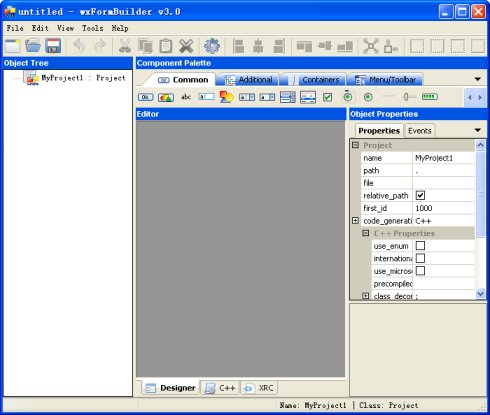
2、从Object Properties(对象属性)面板配置项目的设置
A、选择产生什么类型的代码。 现在你可以生成C++和/或XRC代码。
B、设置生成文件的文件名(只有名称,没有扩展名)。
C、为您的项目输入一个名称。
D、设置代码生成的路径。相对路径“.” 将导致代码生成和项目文件相同的目录中。
E、如果你想所有的文件引用您的项目(例如图像)产生一个相对路径,请选中relative_path 选项 。
F、保存项目。
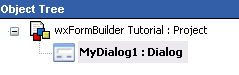
3、转到组件面板,然后按一下Forms标签。 然后,创建一个对话框,按一下第三个图标

现在在对话框中显示的对象树。
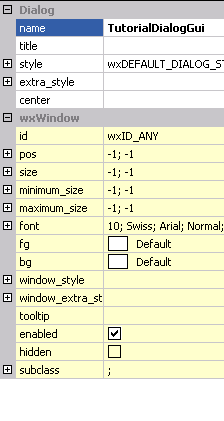
4、现在您可以在对话框中的Object Properties(对象属性)面板配置属性。 例如,改变对话框名称为TutorialDialogGui 。 这个名字也将要产生的C++类的名称
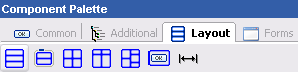
5、在此之后,您准备填入您的对话框的控制和sizers 。 wxFormBuilder只支持基础布局的Sizer,所以你将不得不增加一个Sizer能够插入控制。 转到组件面板,并点击Layout(布局)标签。 然后,点击第一个图标创建一个方块Sizer
6、添加一些控制到Sizer,例如,两个按钮。去Common(通用)标签,并按下第一个图标(

)两次。
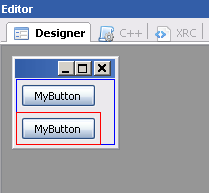
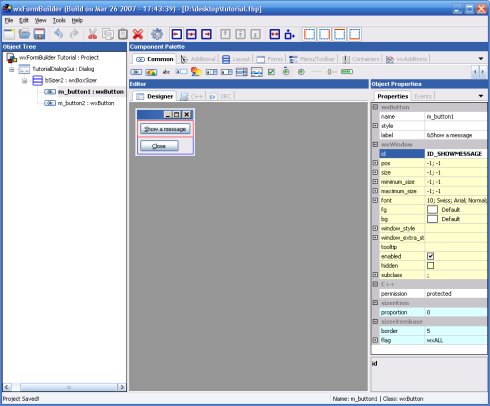
7、在Object Properties(对象属性)面板的label property 中更改图标的标签。 例如,将第一个按钮的标签的属性设为&Show a message,第二个为&Close。同样,分别设置第一个和第二个按钮的id 属性为ID_SHOWMESSAGE和wxID_OK
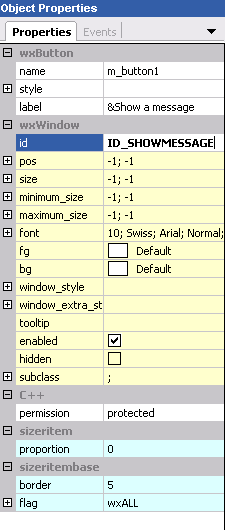
第一个按钮的属性设置。
8、现在,现在是时候增加事件处理程序的按钮。在Object Properties(对象属性)面板中切换到Events标签。 设定第一个按钮的OnButtonClick的值为OnShowMessage,第二个按钮的值设置为OnClose
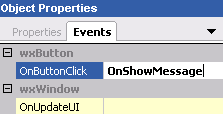
第一个按钮的Events
9、现在,你可以生成代码了!按F8 或

。 如果一切正确的话,在状态栏中你会看到一条消息表示代码已成功产生。 您可以在C++标签中查看输出的代码
10、现在是把生成的代码集成到您的IDE(Visual C++, Dev-C++, Code::Blocks...)中的时候了。加所产生的文件(tutorial_gui.h/CPP)到你的Project(项目)中
11、每次从wxFormBuilder生成的代码时,你的文件将被最后一次产生的代码所覆盖,所以你不能直接增加你的事件处理程序到该文件中。因此,从Tools | Generate Inherited Class(或F6)启动Generate Inherited Class(生成继承类向导)的办法在 wxFormBuilder中生成子类
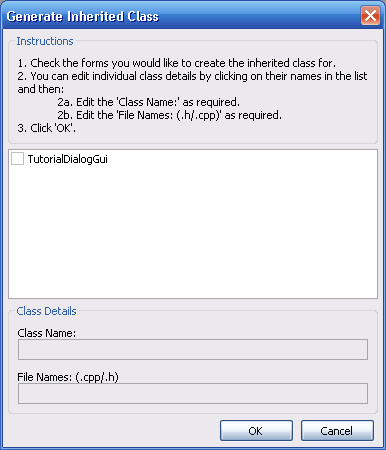
继承类生成对话框
12、选择Form的名称TutorialDialogGui ,你可以修改所产生的类的名称
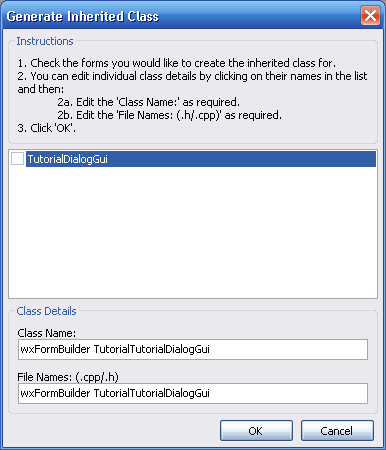
选定Form的名称
13、修改类的名称为TutorialDialog,文件名为tutorial,请确保选中该框,然后单击“OK”(确定)

名称变了,Form也选中了。
14、点击“确定”的对话框中,如果一切顺利的话您会看到一个“类生成的”消息在状态栏中。你可以在的保存项目文件目录下找到生成的代码文件tutorial.cpp和tutorial.h
头文件如下:
#ifndef __tutorial__
#define __tutorial__
#include "tutorial_gui.h"
class TutorialDialog : public TutorialDialogGui
{
public:
TutorialDialog( wxWindow* parent );
};
#endif // __tutorial__
这是例程的源文件:
#include "tutorial.h"
TutorialDialog::TutorialDialog( wxWindow* parent ) : TutorialDialogGui( parent ) {
}
15、现在,您需要添加的执行你的事件处理程序的到生成类TutorialDialog。 事件表是产生tutorial_gui文件中,因此您只需要添加函数到TutorialDialog类。 这里有两个文件的事件处理程序需要添加
在头文件看起来就像这样:
#ifndef __tutorial__
#define __tutorial__
#include "tutorial_gui.h"
class TutorialDialog : public TutorialDialogGui
{
public:
TutorialDialog( wxWindow* parent );
protected:
// Event handlers
void OnShowMessage( wxCommandEvent& event );
void OnClose( wxCommandEvent& event );
};
#endif // __tutorial__
这是例子的源文件:
#include "tutorial.h"
#include <wx/msgdlg.h>
#include <wx/app.h>
TutorialDialog::TutorialDialog( wxWindow* parent )
:
TutorialDialogGui( parent )
{
}
void TutorialDialog::OnShowMessage( wxCommandEvent& event ) {
wxMessageBox( wxT("wxFormBuilder Tutorial") );
}
void TutorialDialog::OnClose( wxCommandEvent& event )
{
wxTheApp->Exit();
}
16、你现在缺少主应用的源文件。 新增两个新的文件到您的项目,并在OnInit() 函数中创建对象的类TutorialDialog 的wxApp派生类
在头文件看起来可能会像这样:
#ifndef __WXWIDGETSAPP_H
#define __WXWIDGETSAPP_H
#include <wx/wx.h>
class wxWidgetsApp : public wxApp
{
public:
wxWidgetsApp();
virtual ~wxWidgetsApp();
virtual bool OnInit();
};
DECLARE_APP(wxWidgetsApp)
#endif
源文件看起来可能会像这样:
#include "wxWidgetsApp.h"
#include "tutorial.h"
IMPLEMENT_APP(wxWidgetsApp)
wxWidgetsApp::wxWidgetsApp()
{
}
wxWidgetsApp::~wxWidgetsApp()
{
}
bool wxWidgetsApp::OnInit()
{
TutorialDialog* dialog = new TutorialDialog( (wxWindow*)NULL );
dialog ->Show();
SetTopWindow( dialog );
return true;
}