本文列举了Direct3D中各种纹理应用实现:黑暗贴图,发光贴图,漫反射映射贴图,细节纹理,纹理混合,有较详尽的注解。其中黑暗贴图,发光贴图,细节纹理都是采用多重纹理的方法实现(也可以采用多次渲染混合实现)。
示例代码使用Beginning direct3D game programming中的框架,省去不少事情,可以专注纹理话题。代码:
点此下载下面来看代码与效果:
正常的纹理贴图效果:
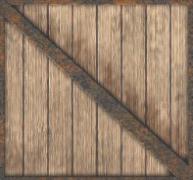
正常的纹理贴图代码:
1 //基本纹理
2void drawNormalTexture()
3

 {
{
4 // 设置box纹理贴图
5 Device->SetTexture(0, texBox);
6 Device->SetTextureStageState(0, D3DTSS_TEXCOORDINDEX, 0); //使用纹理坐标
7 Device->SetTextureStageState(0, D3DTSS_COLORARG1, D3DTA_TEXTURE); // 颜色来源-材质
8 Device->SetTextureStageState(0, D3DTSS_COLOROP, D3DTOP_SELECTARG1); // 使用当前颜色作为第一个texture stage的输出
9
10 // 描绘box
11 Box->draw(0, 0, 0);
12 }
}
黑暗纹理贴图效果:
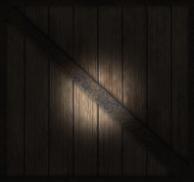
黑暗纹理贴图代码:
1//黑暗映射纹理
2void drawDarkMapTexture()
3{
4 // Multi texture:多重纹理,此处为两重纹理
5 // finalColor = destPixelColor * sourcePixelColor
6 // 设置box纹理贴图
7 Device->SetTexture(0, texBox);
8 Device->SetTextureStageState(0, D3DTSS_TEXCOORDINDEX, 0);
9 Device->SetTextureStageState(0, D3DTSS_COLORARG1, D3DTA_TEXTURE); // 颜色来源-材质
10 Device->SetTextureStageState(0, D3DTSS_COLOROP, D3DTOP_SELECTARG1); // 使用当前颜色作为第一个texture stage的输出
11
12 // 设置黑暗纹理贴图
13 Device->SetTexture(1, texAlpha);
14 Device->SetTextureStageState(1, D3DTSS_TEXCOORDINDEX, 0);
15 Device->SetTextureStageState(1, D3DTSS_COLORARG1, D3DTA_TEXTURE); // 颜色来源-材质
16 Device->SetTextureStageState(1, D3DTSS_COLORARG2, D3DTA_CURRENT); // 颜色来源-前一个texture stage
17 Device->SetTextureStageState(1, D3DTSS_COLOROP, D3DTOP_MODULATE); // 颜色混合:相乘
18
19 // 描绘box
20 Box->draw(0, 0, 0);
21}
漫反射映射贴图效果:夜光镜效果
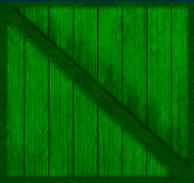
漫反射映射贴图代码:
1//漫射光映射纹理
2void drawDiffuseTexture()
3{
4 // 设置box纹理贴图
5 Device->SetTexture(0, texBox);
6 Device->SetTextureStageState(0, D3DTSS_TEXCOORDINDEX, 0);
7 Device->SetTextureStageState(0, D3DTSS_COLORARG1, D3DTA_TEXTURE); // 颜色来源-材质
8 Device->SetTextureStageState(0, D3DTSS_COLORARG2, D3DTA_DIFFUSE); // 颜色来源-漫反射
9 Device->SetTextureStageState(0, D3DTSS_COLOROP, D3DTOP_MODULATE); // 颜色混合
10
11 // 设置材质:绿色材质实现类似夜光镜的效果
12 Device->SetMaterial(&d3d::GREEN_MTRL);
13
14 // 描绘box
15 Box->draw(0, 0, 0);
16}
发光映射纹理贴图效果:
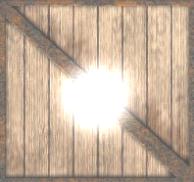
发光映射纹理贴图代码:
1//发光映射纹理
2void drawGlowMapTexture()
3{
4 // Multi texture:多重纹理,此处为两重纹理
5 // finalColor = sourcePixelColor * 1.0 + destPixelColor * 1.0
6 // 设置box纹理贴图
7 Device->SetTexture(0, texBox);
8 Device->SetTextureStageState(0, D3DTSS_TEXCOORDINDEX, 0);
9 Device->SetTextureStageState(0, D3DTSS_COLORARG1, D3DTA_TEXTURE); // 颜色来源-材质
10 Device->SetTextureStageState(0, D3DTSS_COLOROP, D3DTOP_SELECTARG1); // 使用当前颜色作为第一个texture stage的输出
11
12 // 设置黑暗纹理贴图
13 Device->SetTexture(1, texAlpha);
14 Device->SetTextureStageState(1, D3DTSS_TEXCOORDINDEX, 0);
15 Device->SetTextureStageState(1, D3DTSS_COLORARG1, D3DTA_TEXTURE); // 颜色来源-材质
16 Device->SetTextureStageState(1, D3DTSS_COLORARG2, D3DTA_CURRENT); // 颜色来源-前一个texture stage
17 Device->SetTextureStageState(1, D3DTSS_COLOROP, D3DTOP_ADD); // 颜色混合:相加
18
19 // 描绘box
20 Box->draw(0, 0, 0);
21}
细节映射纹理贴图:实现粗糙的凹凸效果

细节映射纹理贴图代码:
1//细节映射纹理:实现凹凸效果
2void drawDetailMapTexture()
3{
4 // Multi texture:多重纹理,此处为两重纹理
5 // finalColor = sourcePixelColor * destPixelColor + destPixelColor * sourcePixelColor
6 // 设置box纹理贴图
7 Device->SetTexture(0, texBox);
8 Device->SetTextureStageState(0, D3DTSS_TEXCOORDINDEX, 0);
9 Device->SetTextureStageState(0, D3DTSS_COLORARG1, D3DTA_TEXTURE); // 颜色来源-材质
10 Device->SetTextureStageState(0, D3DTSS_COLOROP, D3DTOP_SELECTARG1); // 使用当前颜色作为第一个texture stage的输出
11
12 // 设置细节纹理贴图
13 Device->SetTexture(1, texDetail);
14 Device->SetTextureStageState(1, D3DTSS_TEXCOORDINDEX, 0);
15 Device->SetTextureStageState(1, D3DTSS_COLORARG1, D3DTA_TEXTURE); // 颜色来源-材质
16 Device->SetTextureStageState(1, D3DTSS_COLORARG2, D3DTA_CURRENT); // 颜色来源-前一个渲染通道
17 Device->SetTextureStageState(1, D3DTSS_COLOROP, D3DTOP_ADDSIGNED); // 颜色混合
18
19 // 描绘box
20 Box->draw(0, 0, 0);
21}
alpha纹理混合效果:多次渲染实现

alph纹理混合代码:
1//alpha混合纹理
2void drawAlphaBlendTexture()
3{
4 // 多次渲染实现纹理混合
5 // finalColor = sourcePixelColor * sourceBlendFactor + destPixelColor * destBlendFactor
6 // 设置纹理混合参数
7 Device->SetTextureStageState(0, D3DTSS_ALPHAARG1, D3DTA_TEXTURE); // alpha值来自纹理
8 Device->SetTextureStageState(0, D3DTSS_ALPHAOP, D3DTOP_SELECTARG1);
9
10 // 设置混合因子实现透明效果
11 Device->SetRenderState(D3DRS_SRCBLEND, D3DBLEND_SRCALPHA);
12 Device->SetRenderState(D3DRS_DESTBLEND, D3DBLEND_INVSRCALPHA);
13
14 //使用box纹理贴图实现第一次渲染,无alpha混合
15 Device->SetTexture(0, texBox);
16 Device->SetTextureStageState(0, D3DTSS_TEXCOORDINDEX, 0);
17 Device->SetTextureStageState(0, D3DTSS_COLORARG1, D3DTA_TEXTURE); // 颜色来源-材质
18 Device->SetTextureStageState(0, D3DTSS_COLOROP, D3DTOP_SELECTARG1); // 使用当前颜色作为第一个texture stage的输出
19
20 // 第一次描绘box
21 Box->draw(&boxWorldMatrix, 0, 0);
22
23 //使用带alpha值得flower纹理贴图实现第二次渲染,有alpha混合
24 Device->SetTexture(0, texAlphaFlower);
25 Device->SetTextureStageState(0, D3DTSS_TEXCOORDINDEX, 0);
26 Device->SetTextureStageState(0, D3DTSS_COLORARG1, D3DTA_TEXTURE); // 颜色来源-材质
27 Device->SetTextureStageState(0, D3DTSS_COLOROP, D3DTOP_SELECTARG1); // 使用当前颜色作为第一个texture stage的输出
28
29 // 打开纹理混合
30 Device->SetRenderState(D3DRS_ALPHABLENDENABLE, true);
31
32 // 第一次描绘box
33 Box->draw(&boxWorldMatrix, 0, 0);
34
35 // 关闭纹理混合
36 Device->SetRenderState(D3DRS_ALPHABLENDENABLE, false);
37}