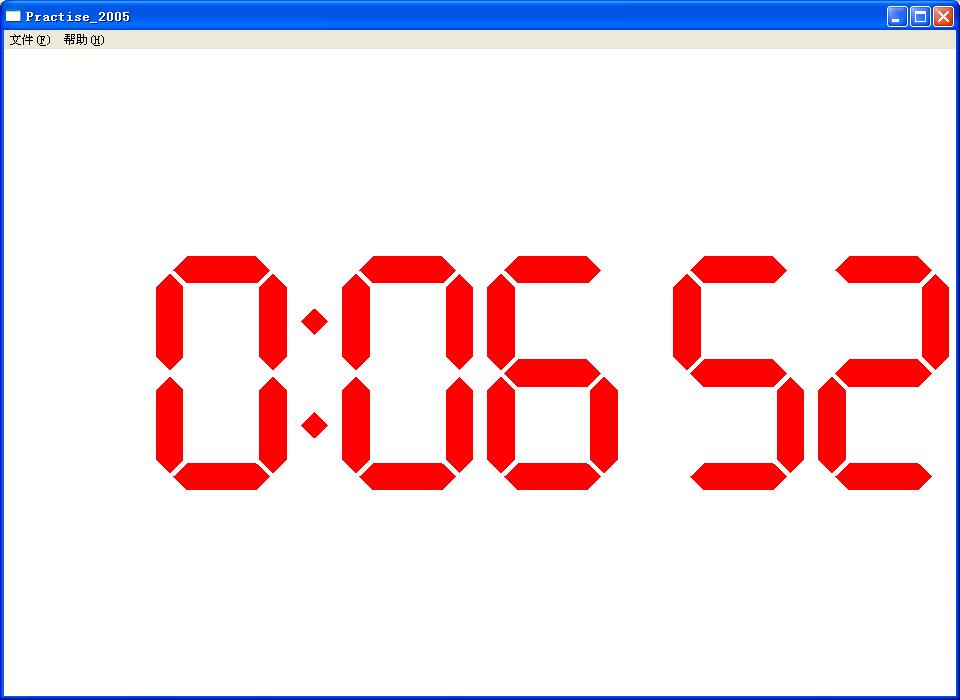
想把游戏里的倒计时用LCD效果的数字时钟来显示,不想用美术的图片,只用代码来写,呵呵。
《windows程序设计》上的例子的改进版:
GDI画的

#define ID_TIMER 1
#define MAX_LOADSTRING 100
// 全局变量:
HINSTANCE hInst; // 当前实例
TCHAR szTitle[MAX_LOADSTRING]; // 标题栏文本
TCHAR szWindowClass[MAX_LOADSTRING]; // 主窗口类名
// 此代码模块中包含的函数的前向声明:
ATOM MyRegisterClass(HINSTANCE hInstance);
BOOL InitInstance(HINSTANCE, int);
LRESULT CALLBACK WndProc(HWND, UINT, WPARAM, LPARAM);
INT_PTR CALLBACK About(HWND, UINT, WPARAM, LPARAM);
int APIENTRY _tWinMain(HINSTANCE hInstance,
HINSTANCE hPrevInstance,
LPTSTR lpCmdLine,
int nCmdShow)
{
UNREFERENCED_PARAMETER(hPrevInstance);
UNREFERENCED_PARAMETER(lpCmdLine);
// TODO: 在此放置代码。
MSG msg;
HACCEL hAccelTable;
// 初始化全局字符串
LoadString(hInstance, IDS_APP_TITLE, szTitle, MAX_LOADSTRING);
LoadString(hInstance, IDC_PRACTISE_2005, szWindowClass, MAX_LOADSTRING);
MyRegisterClass(hInstance);
// 执行应用程序初始化:
if (!InitInstance (hInstance, nCmdShow))
{
return FALSE;
}
hAccelTable = LoadAccelerators(hInstance, MAKEINTRESOURCE(IDC_PRACTISE_2005));
// 主消息循环:
while (GetMessage(&msg, NULL, 0, 0))
{
if (!TranslateAccelerator(msg.hwnd, hAccelTable, &msg))
{
TranslateMessage(&msg);
DispatchMessage(&msg);
}
}
return (int) msg.wParam;
}
//
// 函数: MyRegisterClass()
//
// 目的: 注册窗口类。
//
// 注释:
//
// 仅当希望
// 此代码与添加到 Windows 95 中的“RegisterClassEx”
// 函数之前的 Win32 系统兼容时,才需要此函数及其用法。调用此函数十分重要,
// 这样应用程序就可以获得关联的
// “格式正确的”小图标。
//
ATOM MyRegisterClass(HINSTANCE hInstance)
{
WNDCLASSEX wcex;
wcex.cbSize = sizeof(WNDCLASSEX);
wcex.style = CS_HREDRAW | CS_VREDRAW;
wcex.lpfnWndProc = WndProc;
wcex.cbClsExtra = 0;
wcex.cbWndExtra = 0;
wcex.hInstance = hInstance;
wcex.hIcon = LoadIcon(hInstance, MAKEINTRESOURCE(IDI_PRACTISE_2005));
wcex.hCursor = LoadCursor(NULL, IDC_ARROW);
wcex.hbrBackground = (HBRUSH)(COLOR_WINDOW+1);
wcex.lpszMenuName = MAKEINTRESOURCE(IDC_PRACTISE_2005);
wcex.lpszClassName = szWindowClass;
wcex.hIconSm = LoadIcon(wcex.hInstance, MAKEINTRESOURCE(IDI_SMALL));
return RegisterClassEx(&wcex);
}
//
// 函数: InitInstance(HINSTANCE, int)
//
// 目的: 保存实例句柄并创建主窗口
//
// 注释:
//
// 在此函数中,我们在全局变量中保存实例句柄并
// 创建和显示主程序窗口。
//
BOOL InitInstance(HINSTANCE hInstance, int nCmdShow)
{
HWND hWnd;
hInst = hInstance; // 将实例句柄存储在全局变量中
hWnd = CreateWindow(szWindowClass, szTitle, WS_OVERLAPPEDWINDOW,
CW_USEDEFAULT, 0, CW_USEDEFAULT, 0, NULL, NULL, hInstance, NULL);
if (!hWnd)
{
return FALSE;
}
ShowWindow(hWnd, nCmdShow);
UpdateWindow(hWnd);
return TRUE;
}
void DisplayDigit (HDC hdc, int iNumber)
{
static BOOL fSevenSegment [10][7] = {
1, 1, 1, 0, 1, 1, 1, // 0
0, 0, 1, 0, 0, 1, 0, // 1
1, 0, 1, 1, 1, 0, 1, // 2
1, 0, 1, 1, 0, 1, 1, // 3
0, 1, 1, 1, 0, 1, 0, // 4
1, 1, 0, 1, 0, 1, 1, // 5
1, 1, 0, 1, 1, 1, 1, // 6
1, 0, 1, 0, 0, 1, 0, // 7
1, 1, 1, 1, 1, 1, 1, // 8
1, 1, 1, 1, 0, 1, 1 } ; // 9
static POINT ptSegment [7][6] = {
7, 6, 11, 2, 31, 2, 35, 6, 31, 10, 11, 10,
6, 7, 10, 11, 10, 31, 6, 35, 2, 31, 2, 11,
36, 7, 40, 11, 40, 31, 36, 35, 32, 31, 32, 11,
7 , 36, 11, 32, 31, 32, 35, 36, 31, 40, 11, 40,
6 , 37, 10, 41, 10, 61, 6, 65, 2, 61, 2, 41,
36, 37, 40, 41, 40, 61, 36, 65, 32, 61, 32, 41,
7 , 66, 11, 62, 31, 62, 35, 66, 31, 70, 11, 70 } ;
int iSeg ;
for (iSeg = 0 ; iSeg < 7 ; iSeg++)
{
if (fSevenSegment [iNumber][iSeg])
{
Polygon (hdc, ptSegment [iSeg], 6) ;
}
}
}
void DisplayTwoDigits (HDC hdc, int iNumber, BOOL fSuppress)
{
if (!fSuppress || (iNumber / 10 != 0))
DisplayDigit (hdc, iNumber / 10) ;
OffsetWindowOrgEx (hdc, -42, 0, NULL) ;
DisplayDigit (hdc, iNumber % 10) ;
OffsetWindowOrgEx (hdc, -42, 0, NULL) ;
}
void DisplayColon (HDC hdc)
{
POINT ptColon [2][4] = { 2, 21, 6, 17, 10, 21, 6, 25,
2, 51, 6, 47, 10, 51, 6, 55 } ;
Polygon (hdc, ptColon [0], 4) ;
Polygon (hdc, ptColon [1], 4) ;
OffsetWindowOrgEx (hdc, -12, 0, NULL) ;
}
void DisplayBlank(HDC hdc)
{
OffsetWindowOrgEx (hdc, -12, 0, NULL) ;
}
void DisplayTime (HDC hdc, BOOL f24Hour, BOOL fSuppress)
{
SYSTEMTIME st ;
GetLocalTime (&st) ;
if (f24Hour)
DisplayTwoDigits (hdc, st.wHour, fSuppress) ;
else
DisplayTwoDigits (hdc, (st.wHour %= 12) ? st.wHour : 12, fSuppress) ;
if (st.wSecond % 2 == 0)
{
DisplayColon (hdc) ;
}
else
{
DisplayBlank(hdc);
}
DisplayTwoDigits (hdc, st.wMinute, FALSE) ;
if (st.wSecond % 2 != 0)
{
DisplayColon (hdc) ;
}
else
{
DisplayBlank(hdc);
}
DisplayTwoDigits (hdc, st.wSecond, FALSE) ;
}
//
// 函数: WndProc(HWND, UINT, WPARAM, LPARAM)
//
// 目的: 处理主窗口的消息。
//
// WM_COMMAND - 处理应用程序菜单
// WM_PAINT - 绘制主窗口
// WM_DESTROY - 发送退出消息并返回
//
//
LRESULT CALLBACK WndProc(HWND hWnd, UINT message, WPARAM wParam, LPARAM lParam)
{
int wmId, wmEvent;
PAINTSTRUCT ps;
HDC hdc;
static BOOL f24Hour, fSuppress ;
static HBRUSH hBrushRed ;
static int cxClient, cyClient ;
TCHAR szBuffer [2] ;
switch (message)
{
case WM_COMMAND:
wmId = LOWORD(wParam);
wmEvent = HIWORD(wParam);
// 分析菜单选择:
switch (wmId)
{
case IDM_ABOUT:
DialogBox(hInst, MAKEINTRESOURCE(IDD_ABOUTBOX), hWnd, About);
break;
case IDM_EXIT:
DestroyWindow(hWnd);
break;
default:
return DefWindowProc(hWnd, message, wParam, lParam);
}
break;
case WM_CREATE:
hBrushRed = CreateSolidBrush (RGB (255, 0, 0)) ;
SetTimer (hWnd, ID_TIMER, 1000, NULL) ;// fall through
case WM_SETTINGCHANGE:
GetLocaleInfo (LOCALE_USER_DEFAULT, LOCALE_ITIME, szBuffer, 2) ;
f24Hour = (szBuffer[0] == '1') ;
GetLocaleInfo (LOCALE_USER_DEFAULT, LOCALE_ITLZERO, szBuffer, 2) ;
fSuppress = (szBuffer[0] == '0') ;
InvalidateRect (hWnd, NULL, TRUE) ;
return 0 ;
case WM_SIZE:
cxClient = LOWORD (lParam) ;
cyClient = HIWORD (lParam) ;
return 0 ;
case WM_TIMER:
InvalidateRect (hWnd, NULL, TRUE) ;
return 0 ;
case WM_PAINT:
hdc = BeginPaint(hWnd, &ps);
// TODO: 在此添加任意绘图代码
SetMapMode (hdc, MM_ISOTROPIC) ;
SetWindowExtEx (hdc, 276, 72, NULL) ;
SetViewportExtEx (hdc, cxClient, cyClient, NULL) ;
SetWindowOrgEx (hdc, 138, 36, NULL) ;
SetViewportOrgEx (hdc, cxClient / 2, cyClient / 2, NULL) ;
SelectObject (hdc, GetStockObject (NULL_PEN)) ;
SelectObject (hdc, hBrushRed) ;
DisplayTime (hdc, f24Hour, fSuppress) ;
EndPaint(hWnd, &ps);
break;
case WM_DESTROY:
KillTimer (hWnd, ID_TIMER) ;
DeleteObject (hBrushRed) ;
PostQuitMessage(0);
break;
default:
return DefWindowProc(hWnd, message, wParam, lParam);
}
return 0;
}
// “关于”框的消息处理程序。
INT_PTR CALLBACK About(HWND hDlg, UINT message, WPARAM wParam, LPARAM lParam)
{
UNREFERENCED_PARAMETER(lParam);
switch (message)
{
case WM_INITDIALOG:
return (INT_PTR)TRUE;
case WM_COMMAND:
if (LOWORD(wParam) == IDOK || LOWORD(wParam) == IDCANCEL)
{
EndDialog(hDlg, LOWORD(wParam));
return (INT_PTR)TRUE;
}
break;
}
return (INT_PTR)FALSE;
}
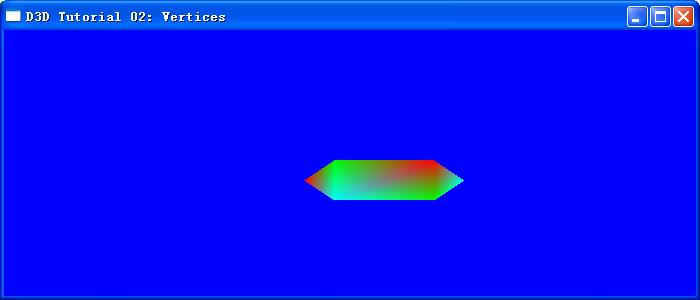
用DX来画:
没写完,部分代码,只画了一个segment.发现用这种方法挺麻烦的。实现起来有点难度。做游戏也好长时间了,还真没搞过这么底层的东东。把引擎挂在嘴边上,不如好好写写这种小玩意儿。呵呵,估计跟我一样的人不少啊,都是用引擎的层层封装的API。

#include <d3d9.h>
#pragma warning( disable : 4996 ) // disable deprecated warning
#include <strsafe.h>
#pragma warning( default : 4996 )
//-----------------------------------------------------------------------------
// Global variables
//-----------------------------------------------------------------------------
LPDIRECT3D9 g_pD3D = NULL; // Used to create the D3DDevice
LPDIRECT3DDEVICE9 g_pd3dDevice = NULL; // Our rendering device
LPDIRECT3DVERTEXBUFFER9 g_pVB = NULL; // Buffer to hold vertices 顶点Buffer
// A structure for our custom vertex type 自定义顶点类型
struct CUSTOMVERTEX
{
FLOAT x, y, z, rhw; // The transformed position for the vertex
DWORD color; // The vertex color
};
// Our custom FVF, which describes our custom vertex structure
// 【2008-03-08】D3DFVF_XYZRHW 是描述经过坐标变换的顶点坐标,就是转换为屏幕坐标了
#define D3DFVF_CUSTOMVERTEX (D3DFVF_XYZRHW|D3DFVF_DIFFUSE)
//-----------------------------------------------------------------------------
// Name: InitD3D()
// Desc: Initializes Direct3D
//-----------------------------------------------------------------------------
HRESULT InitD3D( HWND hWnd )
{
// Create the D3D object.
if( NULL == ( g_pD3D = Direct3DCreate9( D3D_SDK_VERSION ) ) )
return E_FAIL;
// Set up the structure used to create the D3DDevice
D3DPRESENT_PARAMETERS d3dpp;
ZeroMemory( &d3dpp, sizeof(d3dpp) );
d3dpp.Windowed = TRUE;
d3dpp.SwapEffect = D3DSWAPEFFECT_DISCARD;
d3dpp.BackBufferFormat = D3DFMT_UNKNOWN;
// Create the D3DDevice
if( FAILED( g_pD3D->CreateDevice( D3DADAPTER_DEFAULT, D3DDEVTYPE_HAL, hWnd,
D3DCREATE_SOFTWARE_VERTEXPROCESSING,
&d3dpp, &g_pd3dDevice ) ) )
{
return E_FAIL;
}
// Device state would normally be set here
return S_OK;
}
//-----------------------------------------------------------------------------
// Name: InitVB()
// Desc: Creates a vertex buffer and fills it with our vertices. The vertex
// buffer is basically just a chuck of memory that holds vertices. After
// creating it, we must Lock()/Unlock() it to fill it. For indices, D3D
// also uses index buffers. The special thing about vertex and index
// buffers is that they can be created in device memory, allowing some
// cards to process them in hardware, resulting in a dramatic
// performance gain.
//-----------------------------------------------------------------------------
HRESULT InitVB()
{
// Initialize vertices for rendering triangle strips 初始化要渲染的三角形链的顶点
CUSTOMVERTEX vertices[] =
{
{ 300.0f, 150.0f, 0.5f, 1.0f, 0xffff0000, }, // x, y, z, rhw, color
{ 330.0f, 130.0f, 0.5f, 1.0f, 0xff00ff00, },
{ 330.0f, 170.0f, 0.5f, 1.0f, 0xff00ffff, },
{ 430.0f, 130.0f, 0.5f, 1.0f, 0xffff0000, },
{ 430.0f, 170.0f, 0.5f, 1.0f, 0xff00ff00, },
{ 460.0f, 150.0f, 0.5f, 1.0f, 0xff00ffff, },
};
// Create the vertex buffer. 创建vertex buffer
// Here we are allocating enough memory
// (from the default pool) to hold all our 3 custom vertices. We also
// specify the FVF, so the vertex buffer knows what data it contains.
if( FAILED( g_pd3dDevice->CreateVertexBuffer( 6*sizeof(CUSTOMVERTEX),
0, D3DFVF_CUSTOMVERTEX,
D3DPOOL_DEFAULT, &g_pVB, NULL ) ) )
{
return E_FAIL;
}
// Now we fill the vertex buffer. 填充vertex buffer
// To do this, we need to Lock() the VB to
// gain access to the vertices. This mechanism is required becuase vertex
// buffers may be in device memory.
VOID* pVertices; // 输出参数
if( FAILED( g_pVB->Lock( 0, sizeof(vertices), (void**)&pVertices, 0 ) ) )
return E_FAIL;
memcpy( pVertices, vertices, sizeof(vertices) );
g_pVB->Unlock();
return S_OK;
}
//-----------------------------------------------------------------------------
// Name: Cleanup()
// Desc: Releases all previously initialized objects
//-----------------------------------------------------------------------------
VOID Cleanup()
{
if( g_pVB != NULL )
g_pVB->Release();
if( g_pd3dDevice != NULL )
g_pd3dDevice->Release();
if( g_pD3D != NULL )
g_pD3D->Release();
}
//-----------------------------------------------------------------------------
// Name: Render()
// Desc: Draws the scene
//-----------------------------------------------------------------------------
VOID Render()
{
// Clear the backbuffer to a blue color
g_pd3dDevice->Clear( 0, NULL, D3DCLEAR_TARGET, D3DCOLOR_XRGB(0,0,255), 1.0f, 0 );
// Begin the scene
if( SUCCEEDED( g_pd3dDevice->BeginScene() ) )
{
// Draw the triangles in the vertex buffer. 画vertex buffer中的三角形
// This is broken into a few steps.
// We are passing the vertices down a "stream", so first we need
// to specify the source of that stream, which is our vertex buffer.
// 我们正传递顶点到一个“流”里,这个流的源头是vertex buffer
g_pd3dDevice->SetStreamSource( 0, g_pVB, 0, sizeof(CUSTOMVERTEX) );
// Then we need to let D3D know what vertex shader to use.
// 让D3D知道我们用什么vertex shader
// Full, custom vertex shaders are an advanced topic,
// but in most cases the vertex shader is just the FVF,
// so that D3D knows what type of vertices we are dealing with.
g_pd3dDevice->SetFVF( D3DFVF_CUSTOMVERTEX );
// Finally, we call DrawPrimitive() which does the actual rendering
// of our geometry.
// 注意:用三角形链 triangle strips
g_pd3dDevice->DrawPrimitive( D3DPT_TRIANGLESTRIP, 0, 4 );
// End the scene
g_pd3dDevice->EndScene();
}
// Present the backbuffer contents to the display
g_pd3dDevice->Present( NULL, NULL, NULL, NULL );
}
//-----------------------------------------------------------------------------
// Name: MsgProc()
// Desc: The window's message handler
//-----------------------------------------------------------------------------
LRESULT WINAPI MsgProc( HWND hWnd, UINT msg, WPARAM wParam, LPARAM lParam )
{
switch( msg )
{
case WM_DESTROY:
Cleanup();
PostQuitMessage( 0 );
return 0;
}
return DefWindowProc( hWnd, msg, wParam, lParam );
}
//-----------------------------------------------------------------------------
// Name: WinMain()
// Desc: The application's entry point
//-----------------------------------------------------------------------------
INT WINAPI WinMain( HINSTANCE hInst, HINSTANCE, LPSTR, INT )
{
// Register the window class
WNDCLASSEX wc = { sizeof(WNDCLASSEX), CS_CLASSDC, MsgProc, 0L, 0L,
GetModuleHandle(NULL), NULL, NULL, NULL, NULL,
"D3D Tutorial", NULL };
RegisterClassEx( &wc );
// Create the application's window
HWND hWnd = CreateWindow( "D3D Tutorial", "D3D Tutorial 02: Vertices",
WS_OVERLAPPEDWINDOW, 100, 100, 700, 300,
NULL, NULL, wc.hInstance, NULL );
// Initialize Direct3D
if( SUCCEEDED( InitD3D( hWnd ) ) )
{
// Create the vertex buffer
if( SUCCEEDED( InitVB() ) )
{
// Show the window
ShowWindow( hWnd, SW_SHOWDEFAULT );
UpdateWindow( hWnd );
// Enter the message loop
MSG msg;
ZeroMemory( &msg, sizeof(msg) );
while( msg.message!=WM_QUIT )
{
if( PeekMessage( &msg, NULL, 0U, 0U, PM_REMOVE ) )
{
TranslateMessage( &msg );
DispatchMessage( &msg );
}
else
Render();
}
}
}
UnregisterClass( "D3D Tutorial", wc.hInstance );
return 0;
}
posted on 2008-02-28 23:50
七星重剑 阅读(1413)
评论(1) 编辑 收藏 引用 所属分类:
Game Graphics 、
IDE -- visual c++