最近在研究QT,并尝试写了一个小程序。程序的功能很简单,就是进行一些文件的操作:
假如说我有两个文件,分别是文件A,文件B。其中文件A中的前n个字节的数据都为0,这样的文件A我把它视为一个“坏文件”。我要做的就是在文件B中找到A的值为0的数据所对应的数据,并用它替换掉A的“坏数据”。为了保护现场,我将替换好的A保存为文件C。
之所以开发这个程序,是因为最近在下载电视剧的时候,常常发现出现“渲染失败”而不能播放的文件。而补救方法之一就是用一个好的文件替换那个坏了的文件的头n个值为0的字节数据。这个目的现在已经达到了(至少我已经拿他修复了几集电视剧)。
对文件的操作,我使用的是STL中的“流”,然后GUI就使用了现在那个喊得很响的跨平台的开源c++项目--QT。
首先是搭建环境。其实也挺简单的,现在大家都喜欢DEV-C++和Qt4.2结合使用吗,我这里也搭建了一个同样的环境。使用Qt+Dev cpp环境配置这篇随笔中提到了那个老外的模板,拷贝到DEV-C++目录下的Template目录下,就可以了。然后打开开发环境,就可以创建QT项目了。当然如果实在是喜欢用记事本开发,也可以完成代码之后,用命令行编译、链接程序,在帮助文档里面说的很清楚,在你的src目录下依次执行
qmake -project
qmake
make
就可以了。当然更深入的情况下,往往需要对生成的makefile做点手脚。
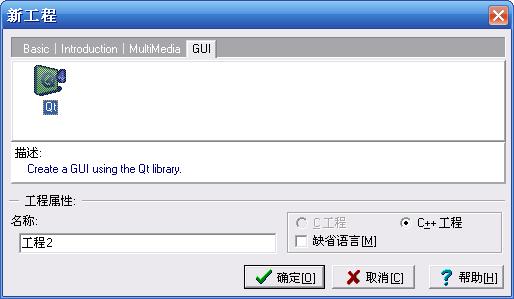
现在回到DEV-C++。打开程序,新建项目
然后确定,创建项目,就生成了我的qt项目。因为我的qt程序中还需要对于QT3的支持,所以需要在编译命令中添加对QT3的支持。如下:
-O2 -O2 -frtti -fexceptions -Wall -DUNICODE -DQT_LARGEFILE_SUPPORT -DQT_DLL -DQT_NO_DEBUG -DQT_CORE_LIB -DQT_GUI_LIB -DQT_THREAD_SUPPORT -DQT_NEEDS_QMAIN -I"G:/Qt/4.3.0/include/QtGui" -I"G:/Qt/4.3.0/include/QtCore" -I"G:/Qt/4.3.0/include" -I"." -I"G:/Qt/4.3.0/include/Qt3Support" -I"G:/Qt/4.3.0/include/ActiveQt" -I"tmp\moc\release_shared" -I"." -I"G:\Qt\4.3.0\mkspecs\win32-g++"
注意黑体部分就是新添加的。当然也可以修改一下模板,让以后的所有程序都具备对于QT3的支持。
不光要修改编译指令,还需要修改链接指令:
-mthreads -Wl,-enable-stdcall-fixup -Wl,-enable-auto-import -Wl,-enable-runtime-pseudo-reloc -Wl, -Wl, -Wl,-subsystem,windows -L"G:\Qt\4.3.0\lib" -L"G:\Qt\4.3.0\lib" -lmingw32 -lqtmain -lQtCore4 -lQtGui4 -lQt3Support4
好了,这样就提供了QT3的支持。
首先,我需要创建文件选择窗口,在这里,我创建两个打开文件窗口和一个保存文件窗口:
1 QTextCodec::setCodecForCStrings(QTextCodec::codecForLocale());
2 QApplication app(argc, argv);
3 QWidget w;
4 QString sErrorFile = Q3FileDialog::getOpenFileName(
5 "/",
6 "RMVB (*.rmvb)",
7 &w,
8 "open file dialog",
9 "选择要修复的文件");
10 QString sTemplateFile=Q3FileDialog::getOpenFileName(
11 "/",
12 "RMVB (*.rmvb)",
13 &w,
14 "open file dialog",
15 "选择参照文件");
16 QString sOutputFile=Q3FileDialog::getSaveFileName(
17 "/",
18 "RMVB (*.rmvb)",
19 &w,
20 "open file dialog",
21 "选择输出文件");
注意第一句让我的程序能够支持中文。
而要使用Q3FileDialog,则要添加Q3支持。
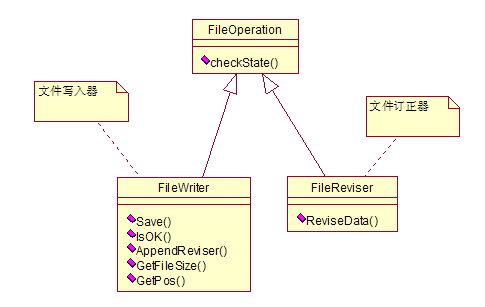
对于文件操作类,这里就不详细列出代码了.类图如下:

因为文件操作是一个比较耗费资源的操作,所以这里我把它放到一个线程里面去。我创建了一个类MainOperation,让它从QThread继承,并处理有关文件的操作:
1 class MainOperation:public QThread
2 {
3 Q_OBJECT
4 public:
5 MainOperation(QString errorFile,QString templateFile,QString outputFile)
6 {
7
8 _errorFile=copyQStringToCharArray(errorFile);
9 _templateFile=copyQStringToCharArray(templateFile);
10 _outputFile=copyQStringToCharArray(outputFile);
11
12 }
13 ~MainOperation()
14 {
15 delete[] _errorFile;
16 delete[] _templateFile;
17 delete[] _outputFile;
18 }
19 protected:
20 void run()
21 {
22 FileWriter fw1(_errorFile);
23 FileReviser fr(_templateFile);
24 fw1.AppendReviser(&fr);
25 emit fileSizedRecognized(fw1.GetFileSize());
26 while(!fw1.IsOK())
27 {
28 fw1.Save(_outputFile);
29 emit posChanged(fw1.GetPos());
30 }
31 emit finished();
32 }
33 signals:
34 void fileSizedRecognized(int fileSize);
35 void posChanged(int pos);
36 void finished();
37
38 private:
39 char * copyQStringToCharArray(QString qstr)
40 {
41 QByteArray array=qstr.toAscii ();
42 char* resultChar=new char[strlen(array.data())];
43 strcpy(resultChar,array.data());
44 return resultChar;
45 }
46 char* _errorFile;
47 char* _templateFile;
48 char* _outputFile;
49
50 };
因为一直在搞c#和java的开发,所以最近写出来的c++代码都是inline的,这确实不符合c++的标准编程习惯。
注意这里不光从QThread继承,还写了这样一个类似宏的东西:Q_OBJECT。其实它还是一个Meta-Object标记。如果这样编译程序的话,编译器会告诉你连接错误。这时候你需要通过命令moc来创建另外一个类,并把这个类引入你的项目,让你的程序加入这个新类的头文件定义。就像这样(类MainOperation被放在文件MainObject中):
meta MainObject.h -o moc_MainObject.h
然后在main.cpp 里面加上:
#include "moc_MainObject.h"
除去#include "MainObject.h"
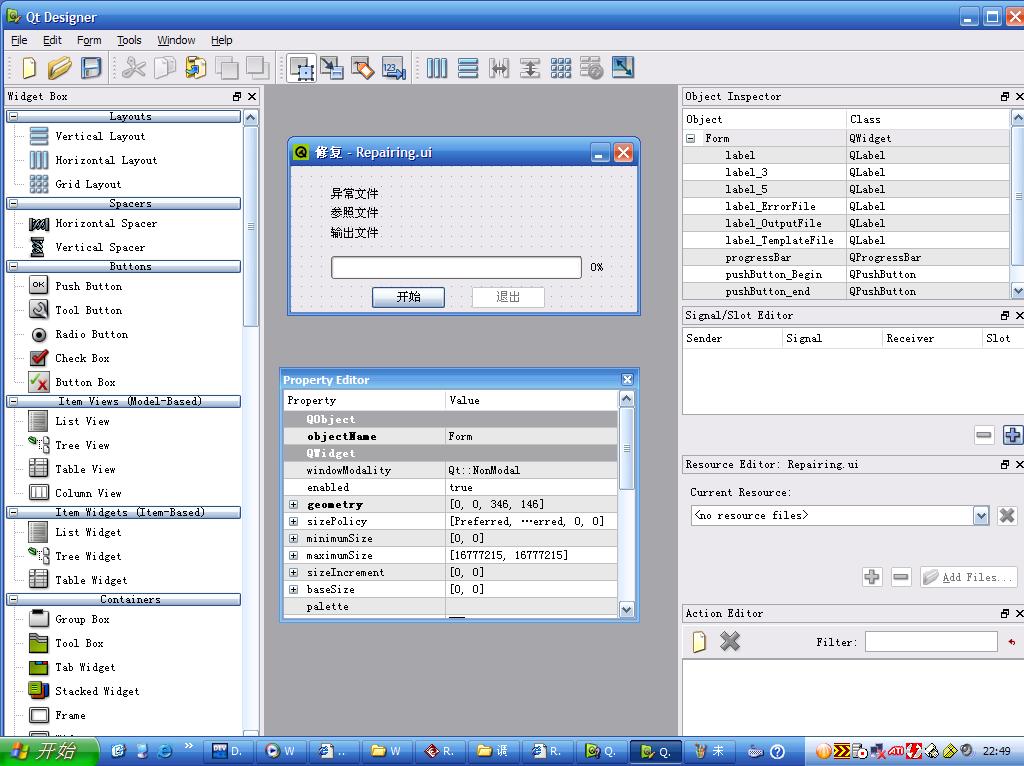
现在开始设计界面了。
打开Designer

保存设计好的文件,存好的文件是一个后缀为ui的文件。这里的文件名是Repairing.ui.
然后通过uic命令把Repairing.ui转变为头文件Repairing.h。
uic Repairing.ui -o Repairing.h
这样就生成了头文件。引入它。这个头文件看上去是这样的:
1 class Ui_Form:public QObject
2 {
3 public:
4 QProgressBar *progressBar;
5 QPushButton *pushButton_end;
6 QLabel *label;
7 QLabel *label_ErrorFile;
8 QLabel *label_3;
9 QLabel *label_TemplateFile;
10 QLabel *label_5;
11 QLabel *label_OutputFile;
12 QPushButton *pushButton_Begin;
13
14 void setupUi(QWidget *Form)
15 {
16 if (Form->objectName().isEmpty())
17 Form->setObjectName(QString::fromUtf8("Form"));
18 QSize size(346, 146);
19 size = size.expandedTo(Form->minimumSizeHint());
20 Form->resize(size);
21 Form->setContextMenuPolicy(Qt::NoContextMenu);
22 Form->setWindowIcon(QIcon(QString::fromUtf8("D:/my pic/\347\273\217\345\205\270\345\233\276\346\240\207/\347\273\217\345\205\270\346\260\264\346\231\266\345\233\276\346\240\207/OS/OS14.jpg")));
23 progressBar = new QProgressBar(Form);
24 progressBar->setObjectName(QString::fromUtf8("progressBar"));
25 progressBar->setGeometry(QRect(40, 90, 281, 23));
26 //progressBar->setValue(0);
27 pushButton_end = new QPushButton(Form);
28 pushButton_end->setObjectName(QString::fromUtf8("pushButton_end"));
29 pushButton_end->setEnabled(true);
30 pushButton_end->setGeometry(QRect(180, 120, 75, 23));
31 label = new QLabel(Form);
32 label->setObjectName(QString::fromUtf8("label"));
33 label->setGeometry(QRect(40, 20, 61, 16));
34 label_ErrorFile = new QLabel(Form);
35 label_ErrorFile->setObjectName(QString::fromUtf8("label_ErrorFile"));
36 label_ErrorFile->setGeometry(QRect(100, 20, 161, 16));
37 label_3 = new QLabel(Form);
38 label_3->setObjectName(QString::fromUtf8("label_3"));
39 label_3->setGeometry(QRect(40, 40, 54, 14));
40 label_TemplateFile = new QLabel(Form);
41 label_TemplateFile->setObjectName(QString::fromUtf8("label_TemplateFile"));
42 label_TemplateFile->setGeometry(QRect(100, 40, 161, 16));
43 label_5 = new QLabel(Form);
44 label_5->setObjectName(QString::fromUtf8("label_5"));
45 label_5->setGeometry(QRect(40, 60, 54, 14));
46 label_OutputFile = new QLabel(Form);
47 label_OutputFile->setObjectName(QString::fromUtf8("label_OutputFile"));
48 label_OutputFile->setGeometry(QRect(100, 60, 161, 16));
49 pushButton_Begin = new QPushButton(Form);
50 pushButton_Begin->setObjectName(QString::fromUtf8("pushButton_Begin"));
51 pushButton_Begin->setGeometry(QRect(80, 120, 75, 23));
52
53 retranslateUi(Form);
54
55 QMetaObject::connectSlotsByName(Form);
56 } // setupUi
57
58 void retranslateUi(QWidget *Form)
59 {
60 Form->setWindowTitle(QApplication::translate("Form", "\344\277\256\345\244\215", 0, QApplication::UnicodeUTF8));
61 pushButton_end->setText(QApplication::translate("Form", "\351\200\200\345\207\272", 0, QApplication::UnicodeUTF8));
62 label->setText(QApplication::translate("Form", "\345\274\202\345\270\270\346\226\207\344\273\266", 0, QApplication::UnicodeUTF8));
63 label_ErrorFile->setText(QString());
64 label_3->setText(QApplication::translate("Form", "\345\217\202\347\205\247\346\226\207\344\273\266", 0, QApplication::UnicodeUTF8));
65 label_TemplateFile->setText(QString());
66 label_5->setText(QApplication::translate("Form", "\350\276\223\345\207\272\346\226\207\344\273\266", 0, QApplication::UnicodeUTF8));
67 label_OutputFile->setText(QString());
68 pushButton_Begin->setText(QApplication::translate("Form", "\345\274\200\345\247\213", 0, QApplication::UnicodeUTF8));
69 Q_UNUSED(Form);
70 } // retranslateUi
71
72 };
73 namespace Ui {
74 class Form: public Ui_Form
75 {
76
77 };
78 } // namespace Ui
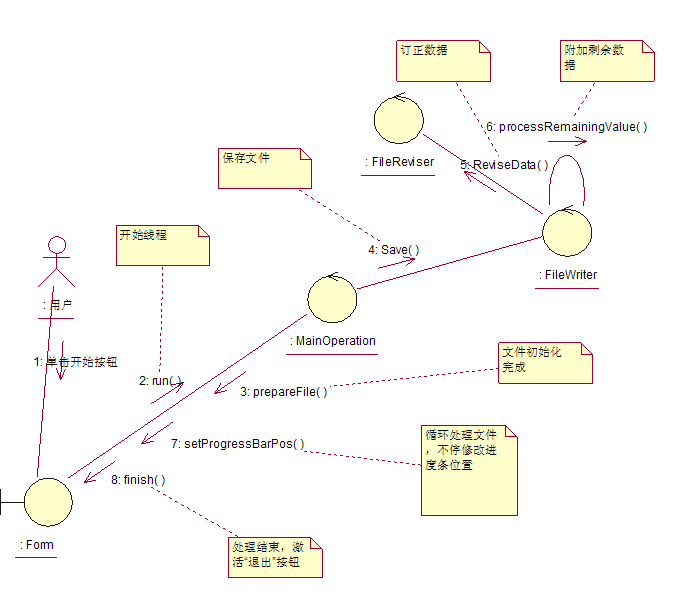
整个调用过程是这样的。下图有不完善的地方。实际上更改进度条状态的动作在处理文件时不停的发出。

这里我不直接让UI去调用MainOperation的方法,也不让MainOperation直接回调。这里采用Qt的信号/插槽机制:
在MainOperation中:
1 signals:
2 void fileSizedRecognized(int fileSize);
3 void posChanged(int pos);
4 void finished();
这三个信号映射到Form的三个Slot:
1 public slots:
2 void prepareFile(int fileSize)
3 {
4 pushButton_Begin->setEnabled(false);
5 pushButton_end->setEnabled(false);
6 _fileSize=fileSize;
7 progressBar->setMinimum(0);
8 progressBar->setMaximum(_fileSize);
9 }
10 void setProgressBarPos(int pos)
11 {
12 emit ProgressbarPositionChanged(pos);
13 }
14 void finish()
15 {
16 pushButton_end->setEnabled(true);
17 }
而Form的信号ProgressbarPositionChanged又被映射到Progressbar的setvalue的Slot。这个插接动作在main.cpp里面完成如:
1 Ui::Form ui;
2 ui.setupUi(&w);
3 ui.label_ErrorFile->setText(sErrorFile);
4 ui.label_TemplateFile->setText(sTemplateFile);
5 ui.label_OutputFile->setText(sOutputFile);
6 MainOperation mainOp(sErrorFile,sTemplateFile,sOutputFile);
7 QObject::connect(ui.pushButton_Begin,SIGNAL(clicked()),&mainOp,SLOT(start()));
8 QObject::connect(&mainOp,SIGNAL(fileSizedRecognized(int)),&ui,SLOT(prepareFile(int)));
9 QObject::connect(&mainOp,SIGNAL(posChanged(int)),&ui,SLOT(setProgressBarPos(int)));
10 QObject::connect(&ui,SIGNAL(ProgressbarPositionChanged(int)),ui.progressBar,SLOT(setValue(int)));
11 QObject::connect(&mainOp,SIGNAL(finished()),&ui,SLOT(finish()));
12 QObject::connect(ui.pushButton_end, SIGNAL(clicked()), &app, SLOT(quit()));
因为在Repairing.h中使用了自定义的Signal/Slot,即:
1 class Form: public Ui_Form
2 {
3 Q_OBJECT
4 private:
5 int _fileSize;
6 QMutex mutex;
7 public slots:
8 void prepareFile(int fileSize)
9 {
10 pushButton_Begin->setEnabled(false);
11 pushButton_end->setEnabled(false);
13 _fileSize=fileSize;
14 progressBar->setMinimum(0);
15 progressBar->setMaximum(_fileSize);
17 }
18 void setProgressBarPos(int pos)
19 {
20 emit ProgressbarPositionChanged(pos);
31 }
32 void finish()
33 {
34 pushButton_end->setEnabled(true);
35 }
37 signals:
38 void ProgressbarPositionChanged(int pos);
39 };
所以仍然使用moc导出另外一个.h文件:
moc Repairing.h -o moc_Repairing.h
在main.cpp中include这个文件,除去对Repairing.h文件的包含。这样整个程序就算完成了。
注意为什么这里Form与ProgressBar之间仍然要使用Signal/Slot呢?因为在多线程操作里面,不能够直接使用setValue更改ProgressBar的进度条位置。这个问题曾经困扰了我好几天。
代码
posted on 2007-07-31 23:33
littlegai 阅读(3542)
评论(1) 编辑 收藏 引用 所属分类:
我的代码玩具